We start by creating a new Grails application with the GDSFlex plugin (now at version 0.2), assuming Grails 1.1 is installed somewhere :
grails create-app gdsexample
cd gdsexample
grails install-plugin gdsflex
The main part of the job is to define our model. We are going to build a very simple book manager, so we will need two Book and Chapter domain classes.
grails create-domain-class Book
grails create-domain-class Chapter
These domain classes are empty for now so let's add a few properties.
grails-app/domain/Book.groovy
import javax.persistence.*

@Entity
class Book {

    static constraints = {
        title(size:0..100, blank:false)
    }

    @Id
    Long id

    @Version
    Integer version

    String uid

    String title

    String author

    String description

    Set<Chapter> chapters
    static hasMany = [chapters:Chapter]
    static mapping = {
        chapters cascade:"all,delete-orphan"
    }
}
grails-app/domain/Chapter.groovy :
import javax.persistence.*

@Entity
class Chapter {

    static constraints = {
        title(size:0..100, blank:false)
    }

    @Id
    Long id

    @Version
    Integer version

    String uid

    Book book

    String title

    String summary
}
You can notice that these are not pure GORM entities. GraniteDS requires at least the 3 JPA annotations @Entity, @Id and @Version to be able to correctly generate the AS3 classes. This is the only restriction on the domain classes and all other fields can be defined as for any GORM entity.
Another particularity of these domain classes is the uid field that will be used as a unique identifier when exchanging data between the Flex, Hibernate and database layers. It's not mandatory to have one but it can save a lot of problems (mainly with new entities created from Flex).
Now let's try to compile the project :
grails compile
You can notice in the console that the Grails compilation has triggered the Gas3 generator and that there are 4 new AS3 classes in grails-app/views: Book.as, BookBase.as, Chapter.as, ChapterBase.as.
In general you won't even have to think about these classes and you can just use them in your Flex application. If you need to add some behaviour to the Flex model, you can just modify the non 'Base' classes that won't be overwritten by the generator process.
We need something to show in our Flex application, so we'll simply use Grails scaffolding to get a simple Web UI and populate some data.
grails create-controller Book
Edit the controller in grails-app/controllers/BookController.groovy :
class BookController {

    def index = { redirect(action:list, params:params) }

    static scaffold = Book
}
Go to http://localhost:8080/gdsexample/book/list and create a few books.
To display these books in a Flex application, we will make use of the PagedQuery Flex component that handles data paging and sorting with a server backend. First we need to create the corresponding Grails service that implements a 'find' method:
grails create-service BookList
grails-app/services/BookListService.groovy :
import org.granite.tide.annotations.TideEnabled

@TideEnabled
class BookListService {

    boolean transactional = true

    def find(filter, offset, max, sort, order) {
        if (max == 0)
            max = 20

        return [
            firstResult: offset,
            maxResults: max,
            resultCount: Book.count(),
            resultList: Book.list([offset: offset, max: max, sort: sort, order: order ? "desc" : "asc"])
        ]
    }
}
The only remarkable thing is the TideEnabled annotation that will tell the GraniteDS Tide library that the component can be called from Flex.
Next we build the Flex MXML views:
grails-app/views/GDSExample.mxml:
<?xml version="1.0" encoding="utf-8"?>

<mx:Application
    xmlns:mx="http://www.adobe.com/2006/mxml"
    xmlns="*"
    layout="vertical"
    backgroundGradientColors="[#0e2e7d, #6479ab]"
    preinitialize="Spring.getInstance().initApplication()">

    <mx:Script>
        <![CDATA[
            import org.granite.tide.spring.Spring;
        ]]>
    </mx:Script>

    <mx:VBox id="mainUI" width="100%">
        <mx:ApplicationControlBar id="acb" width="100%">
            <mx:Label text="GraniteDS / Grails example" fontSize="18" fontWeight="bold" color="#f0f0f0"/>
        </mx:ApplicationControlBar>
    </mx:VBox>

    <BookUI id="bookUI" width="100%" height="100%"/>
</mx:Application>
The important thing here is the preinitialize handler that bootstraps the Tide runtime.
Here start the interesting things, the MXML component that will display the list.
Comments in the source code explain the important parts.
grails-app/views/BookUI.mxml:
<?xml version="1.0" encoding="utf-8"?>

<mx:Panel
    xmlns:mx="http://www.adobe.com/2006/mxml"
    xmlns="*"
    width="100%"
    label="Book Manager"
    creationComplete="list()">

    <!--
        The [Name] metadata indicates that the component has to be managed by Tide.
        This will enable Tide property injections and observer methods.
        As we don't specify a name here, the component will get the name of the Flex component.
        Here the name will be 'bookUI' as defined by the parent MXML.
    -->
    <mx:Metadata>
        [Name]
    </mx:Metadata>

    <mx:Script>
        <![CDATA[
            import org.granite.tide.spring.PagedQuery;

            // This is a property injection definition.
            // The PagedQuery component needs to be linked to a server counterpart with the same name,
            // so here the property is named 'bookListService' as the Grails service.
            // The [In] annotation indicates that the property has to be injected by Tide,
            // meaning that Tide will automatically create a PagedQuery component and bind it to the property.
            // PagedQuery extends the standard Flex ListCollectionView and can be used directly
            // as a data provider for the DataGrid (as shown below).
            [Bindable] [In]
            public var bookListService:PagedQuery;

            // This specifies an observer method that will be called
            // when a Tide event with this name is dispatched. It will be used later.
            [Observer("listBook")]
            public function list():void {
                bookListService.refresh();
            }
        ]]>
    </mx:Script>

    <mx:TabNavigator id="nav" width="100%" height="100%">
        <mx:VBox label="Book List">
            <mx:DataGrid id="dgList" dataProvider="{bookListService}" width="400" height="200">
                <mx:columns>
                    <mx:DataGridColumn dataField="title"/>
                    <mx:DataGridColumn dataField="author"/>
                </mx:columns>
            </mx:DataGrid>

            <mx:Button label="Refresh" click="list()"/>
        </mx:VBox>
    </mx:TabNavigator>

</mx:Panel>
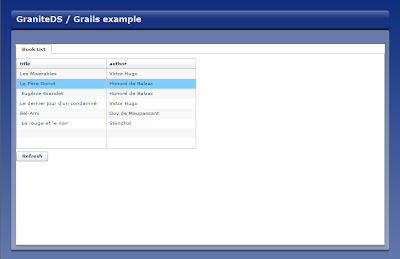
If you go to http://localhost:8080/gdsexample/GDSExample.swf, you will get a first look at the application. Unfortunately that first look will be an ArgumentError popup at startup. What has happened is that the Flex compiler did not include the Book class in the swf and that the serialization of the Book objects failed. You can check that we have no reference to the Person class anywhere in the code. To have our application work, we just have to force the compiler to take our class by adding the following variable definition in the MXML script:
public var dummyBook:Book;
This dummy definition will not be needed any more at the end when we will have a book form that references this class.

You can check one of the important features of the Tide framework, the entity cache. If you select a row of the grid and click the refresh button, the selection is not lost, meaning that the instances of the books are exactly the same and are just updated with the data coming from the server.
Ok, we now have a list, that would be useful to be able to create or edit books, so we need to add a few buttons.
<?xml version="1.0" encoding="utf-8"?>

<mx:Panel
    xmlns:mx="http://www.adobe.com/2006/mxml"
    xmlns="*"
    width="100%"
    label="Book Manager"
    creationComplete="list()">

    <mx:Metadata>
        [Name]
    </mx:Metadata>

    <mx:Script>
        <![CDATA[
            import mx.events.ItemClickEvent;
            import mx.collections.ArrayCollection;
            import mx.controls.Alert;
            import mx.binding.utils.BindingUtils;
            import org.granite.tide.events.TideUIConversationEvent;
            import org.granite.tide.events.TideResultEvent;
            import org.granite.tide.spring.Spring;
            import org.granite.tide.spring.PagedQuery;

            public var dummyBook:Book;

            [Bindable] [In]
            public var bookListService:PagedQuery;

            [Observer("listBook")]
            public function list():void {
                bookListService.refresh();
            }

            private function initButtonBar():void {
                BindingUtils.bindProperty(bbMain.getChildAt(1), "enabled", dgList, "selectedItem");
            }

            private function clickHandler(event:ItemClickEvent):void {
                if (event.index == 0)
                    dispatchEvent(new TideUIConversationEvent('New Book', 'editBook'));
                else if (event.index == 1 && dgList.selectedItem)
                    dispatchEvent(new TideUIConversationEvent('Book#' + dgList.selectedItem.id, 'editBook', dgList.selectedItem));
            }
        ]]>
    </mx:Script>

    <mx:TabNavigator id="nav" width="100%" height="100%">
        <mx:VBox label="Book List">
            <mx:ButtonBar id="bbMain" creationComplete="initButtonBar()" itemClick="clickHandler(event);">
                <mx:dataProvider>
                    <mx:Array>
                        <mx:String>New Book</mx:String>
                        <mx:String>Edit Book</mx:String>
                    </mx:Array>
                </mx:dataProvider>
            </mx:ButtonBar>

            <mx:DataGrid id="dgList" dataProvider="{bookListService}" width="400" height="200">
                <mx:columns>
                    <mx:DataGridColumn dataField="title"/>
                    <mx:DataGridColumn dataField="author"/>
                </mx:columns>
            </mx:DataGrid>

            <mx:Button label="Refresh" click="list()"/>
        </mx:VBox>
    </mx:TabNavigator>

</mx:Panel>
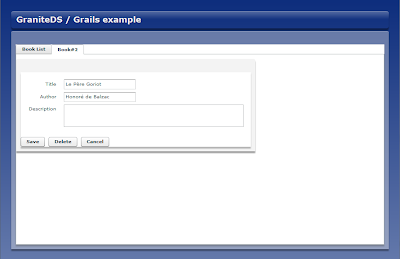
Just adding buttons unfortunately won't be enough, we have to define a controller and UI for the editor panel. Note that the buttons we have defined just dispatch TideUIConversation events. Our application still works, but the new buttons just don't do anything as there is no observer for these events. This shows how the Observer pattern in the Tide framework can help decouple the various parts of the application. We'll see below what conversations mean.
Before that, we have to build the Grails controller to edit books.
grails create-controller BookEdit
grails-app/controllers/BookEditController.groovy :
import org.granite.tide.annotations.TideEnabled

@TideEnabled
class BookEditController {

    // The bookInstance property of the controller will be the model that we bind to the Flex view.
    Book bookInstance

    // The remove method has nothing very particular and is very similar
    // to the default delete method of the standard Grails controller scaffolding.
    def remove = {
        bookInstance = Book.get(params.id)
        if (bookInstance)
            bookInstance.delete()
    }

    // The merge and persist method are similar: we get the bookInstance from the params map
    // and merge/persist it in the current persistence context.
    // Note that we get directly a typed Hibernate detached entity from the params map,
    // we'll see below how this map is sent by the client.
    // The validation part is a little different from classic Grails controllers, so we'll see it later.
    def merge = {
        bookInstance = params.bookInstance

        if (!bookInstance.validate())
            throw new org.granite.tide.spring.SpringValidationException(bookInstance.errors);

        bookInstance = bookInstance.merge()
    }

    def persist = {
        bookInstance = params.bookInstance

        if (!bookInstance.validate())
            throw new org.granite.tide.spring.SpringValidationException(bookInstance.errors);

        bookInstance.save()
    }
}
And we keep the more complex part for the end.
grails-app/views/BookEdit.mxml:
<?xml version="1.0" encoding="utf-8"?>

<mx:VBox
    xmlns:mx="http://www.adobe.com/2006/mxml"
    xmlns="*"
    width="100%"
    label="{create ? "New book" : bookInstance.title}">

    <mx:Script>
        <![CDATA[
            import mx.controls.Alert;
            import mx.events.CloseEvent;
            import mx.containers.TabNavigator;
            import mx.collections.ArrayCollection;
            import org.granite.tide.spring.Context;
            import org.granite.tide.events.TideResultEvent;
            import org.granite.tide.events.TideFaultEvent;


            // The Tide context is injected in the component.
            // It will be used to manage the conversation.
            [Bindable] [In]
            public var context:Context;

            // We get injected with the main tab navigator with a kind of EL expression.
            // We could also have accessed the component with context.bookUI.nav
            [Bindable] [In("#{bookUI.nav}")]
            public var nav:TabNavigator;

            // We get injected with a proxy of the Grails edit controller.
            [Bindable] [In]
            public var bookEditController:Object;

            // We make a two-way binding between the bookInstance to the context.
            // So we can set the instance in this component and get it back from
            // outside.
            [Bindable] [In] [Out]
            public var bookInstance:Book;

            [Bindable]
            private var create:Boolean;


            // This observer will be called when someone dispatches the editBook Tide event.
            [Observer("editBook")]
            public function edit(bookInstance:Book = null):void {
                create = bookInstance == null;
                if (create) {
                    this.bookInstance = new Book();
                    this.bookInstance.chapters = new ArrayCollection();
                }
                else
                    this.bookInstance = bookInstance;

                // Add itself as a child tab in the main view
                if (!nav.getChildByName(this.name))
                    nav.addChild(this);
                nav.selectedChild = this;
            }


            private function save():void {
                bookInstance.title = title.text;
                bookInstance.author = author.text;
                bookInstance.description = description.text;

                // The 'Save' button calls the remote controller and passes it a params map.
                // That's how the Grails controller can get the book with params.bookInstance.
                if (create)
                    bookEditController.persist({ bookInstance: bookInstance }, saveResult);
                else
                    bookEditController.merge({ bookInstance: bookInstance }, saveResult);
            }

            // Result handler for the remote controller call
            private function saveResult(event:TideResultEvent):void {
                nav.removeChild(this);
                // If the book was a new one, trigger a refresh of the list to show the new book.
                // Note once again that we don't know here who will handle the raised event.
                if (create)
                    context.raiseEvent("listBook");
                // Merges the current conversation context in the global context
                // (update the existing entities) and destroys the current conversation context.
                context.meta_end(true);
            }

            private function cancel():void {
                nav.removeChild(this);
                // The cancel button does not merge the conversation in the global context,
                // so all that has been modified in the form is discarded.
                context.meta_end(false);
            }


            public function remove():void {
                Alert.show('Are you sure ?', 'Confirmation', (Alert.YES | Alert.NO),
                    null, removeConfirm);
            }

            private function removeConfirm(event:CloseEvent):void {
                if (event.detail == Alert.YES)
                    bookEditController.remove({id: bookInstance.id}, removeResult);
            }

            private function removeResult(event:TideResultEvent):void {
                nav.removeChild(this);
                context.raiseEvent("listBook");
                context.meta_end(true);
            }
        ]]>
    </mx:Script>

    <mx:Panel>
        <mx:Form id="bookForm">
            <mx:FormItem label="Title">
                <mx:TextInput id="title" text="{bookInstance.title}"/>
            </mx:FormItem>
            <mx:FormItem label="Author">
                <mx:TextInput id="author" text="{bookInstance.author}"/>
            </mx:FormItem>
            <mx:FormItem label="Description">
                <mx:TextArea id="description" text="{bookInstance.description}" width="400" height="50"/>
            </mx:FormItem>
        </mx:Form>

        <mx:HBox>
            <mx:Button label="Save" click="save()"/>
            <mx:Button label="Delete" enabled="{!create}" click="remove()"/>
            <mx:Button label="Cancel" click="cancel()"/>
        </mx:HBox>
    </mx:Panel>

</mx:VBox>
The last thing is to define this MXML as a Tide-managed conversation component by adding this in a static block in BookUI.mxml.
Spring.getInstance().addComponent("bookEdit", BookEdit, true);The last parameter set to true indicates that the component will be created in a conversation context. Conversations are a means to have separate component containers that have their own namespace. Each context also has its own entity cache, so changes on entities in a conversation are separate from other conversations.
If you now browse http://localhost:8080/gdsexample/GDSExample.swf, you can check that you can create new books, but if you try to edit an existing book, you encounter the famous LazyInitializationException when clicking 'Save'. Remembering that the Grails controller gets detached objects, and that the chapters collection is defined lazy, it's clear that we cannot apply the default Grails validation to the bookInstance. We have to disable 'deepValidate' for now.
grails-app/controllers/BookEditController.groovy:
def merge = {
    bookInstance = params.bookInstance

    if (!bookInstance.validate([deepValidate: false]))
        throw new org.granite.tide.spring.SpringValidationException(bookInstance.errors);

    bookInstance = bookInstance.merge([deepValidate: false])
}
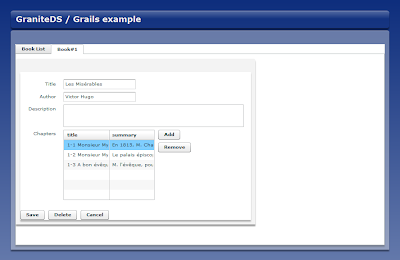
This time everything should work as expected, you can create, update and delete books. However we have left the chapters aside for now, except that it has brought an issue with lazy loading. We would still like to edit the chapters of a book in the form. All we have to do is to add an editable DataGrid in the Book form:
            <mx:FormItem label="Chapters">
                <mx:HBox>
                    <mx:DataGrid id="chapters" dataProvider="{bookInstance.chapters}" editable="true">
                        <mx:columns>
                            <mx:DataGridColumn dataField="title"/>
                            <mx:DataGridColumn dataField="summary"/>
                        </mx:columns>
                    </mx:DataGrid>

                    <mx:VBox>
                        <mx:Button label="Add"
                            click="addChapter()"/>
                        <mx:Button label="Remove"
                            enabled="{Boolean(chapters.selectedItem)}"
                            click="removeChapter()"/>
                    </mx:VBox>
                </mx:HBox>
            </mx:FormItem>
And the corresponding add/remove event handlers:
            private function addChapter():void {
                var chapter:Chapter = new Chapter();
                chapter.book = bookInstance;
                chapter.title = "";
                chapter.summary = "";
                bookInstance.chapters.addItem(chapter);
                chapters.editedItemPosition = {columnIndex: 0, rowIndex: bookInstance.chapters.length-1 };
            }

            private function removeChapter():void {
                bookInstance.chapters.removeItemAt(chapters.selectedIndex);
            }
Now that the chapters collection is always initialized, we could even reactivate the deepValidate option in the BookEditController merge closure.

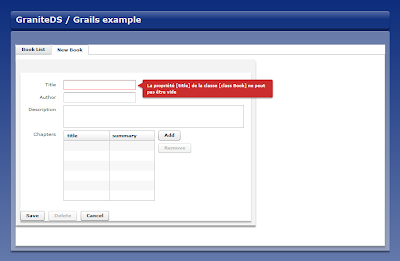
Finally we will add a minimal validation to show the integration with Grails validation. First we have to activate the client handling of the validation errors in a static block of the main application:
grails-app/views/GDSExample.mxml :
    <mx:Script>
        <![CDATA[
            import org.granite.tide.spring.Spring;
            import org.granite.tide.validators.ValidatorExceptionHandler;

            Spring.getInstance().addExceptionHandler(ValidatorExceptionHandler);
        ]]>
    </mx:Script>
grails-app/views/BookEdit.mxml :
<mx:VBox
    xmlns:mx="http://www.adobe.com/2006/mxml"
    xmlns:tv="org.granite.tide.validators.*"
    ...

    <tv:TideEntityValidator entity="{bookInstance}" property="title" listener="{title}"/>
</mx:VBox>

We've just added a validator for the 'title' property, but it's easy to add one for every field. Of course that doesn't make much sense in this case because a purely client-side Flex validator would be more effective, but it can be used anywhere a Grails validation can.
With this simple example, we have already seen many important features of GraniteDS/Tide: the Tide client container with injection and observers, the entity cache, the conversation contexts, lazy loading, data paging and Java server integration. The complete project files can be downloaded here and can just be unzipped in the Grails project folder after create-app and install-plugin.
In a next post, I will show how you can easily add security to the mix, and maybe collaborative data updates between users with the 0.3 plugin.
As always, feedback and suggestions are welcome.
5 commentaires:
well writtten post. Thanks for familiarizing new technology.Interesting plugin.
Regards
Cartography
Thank you for this great Grails plugin and the tutorial. I am trying to get lazy loading running with BlazeDS and dpHibernate and other tools and get crazy. Every time I have little success a new problem occurs. So I am really surprised that GDS is running so smart.
But I have also some remarks to your tutorial.
1.
The mxml files must be located in views/mxml because the WebCompiler is configured in that way (maybe this is an issue of the newest plugin version?)
2.
The bookListService.refresh() function does not do anything. After creating a new book I have to reload the application to see the newly created book.
3.
The statement
label="{create ? "New book" : bookInstance.title}"
must not use double quotes for "New book". It has to use 'New book'. Otherwise the swf can´t be created.
Best regards
Helmut
Really great!
For 2. If you expect your list to be refreshed after you added a new record, you have to call fullRefresh instead.
The refresh method will only update currently loaded records (If I understood the way it works).
Si with refresh, your new record will appear only if you have updated another one already displayed in the DataGrid.
Ride On!
Yann
I try to add :
class Author {
String name
}
and I add author field in chapter
I want to show it in the datagrid but it show error item is null.
can you help me with that problem?
thanks.
Hello there, I think Im missing something, but I cannot compile gfs flex grails plugin (trunk and last tag):
s
[groovyc] location: class org.granite.grails.gas3.GrailsAs3GroovyTransformer
[groovyc] javaType = new GrailsServiceClass(this, clazz, url);
[groovyc] ^
[groovyc] 1 error
Do I need something to setup?
Thanks
Enregistrer un commentaire