mardi 1 décembre 2009

Advanced data features of the Tide framework

Two powerful features of the Tide framework are demonstrated in the example projects but very poorly documented (or not documented at all) : collaborative data updates and concurrent updates conflicts detection/resolution.

Collaborative data updates is the ability to transparently push updates made on an entity by a user to all other interested users. Here is how it works :

  • First tracked entities have to be listened by the DataPublishListener entity listener. If all entities need to be tracked, just put the listener on some AbstractEntity mapped superclass :
    @Entity
    @EntityListeners({DataPublishListener.class})
    public class MyEntity {
    ...
    }

  • Define a Gravity topic to push the updates :
    For example with Seam or Spring, just add this in your configuration file :
    <graniteds:messaging-destination id="myTopic" no-local="true" session-selector="true"/>

    The important thing is to specify the session selector parameter that will allow Tide to store the Gravity/JMS selector in the user client session. It's also useful to set no-local so a client does not receive its own updates. In the classic services-config.xml configuration file, just use :
    <service id="gravity-service"
    class="flex.messaging.services.MessagingService"
    messageTypes="flex.messaging.messages.AsyncMessage">
    <adapters>
    <adapter-definition id="simple" class="org.granite.gravity.adapters.SimpleServiceAdapter"/>
    </adapters>

    <destination id="myTopic">
    <properties>
    <no-local>true</no-local>
    <session-selector>true</session-selector>
    </properties>
    <channels>
    <channel ref="my-gravityamf"/>
    </channels>
    <adapter ref="simple"/>
    </destination>
    </service>
    If transactions or high scalabilty are needed it can work also with a JMS or ActiveMQ topic.

  • All server components annotated with @DataEnabled are intercepted by Tide and the annotation parameters are used to determine the push configuration (topic and selection of pushed clients).
    @DataEnabled(topic="myTopic", params=MyParams.class, publish=PublishMode.ON_SUCCESS)
    public class MyComponent {
    ...
    }

  • PublishMode.ON_SUCCESS indicates that Tide will automatically push the updates for all successful remote calls. PublishMode.ON_COMMIT is not available for now but will be implemented later to get transactional behaviour in JEE environments. The default is PublishMode.MANUAL that requires to call the push method manually with :
    DataContext.publish();

  • The params class defines which clients will receive which updates. It internally uses JMS-like selectors to route messages. Let's see the simplest possible one :
    public class ObserveAllPublishAll implements DataTopicParams {
    @Override
    public void observes(DataObserveParams params) {
    }

    @Override
    public void publishes(DataPublishParams params, Object entity) {
    }
    }
    The observes method indicates which criteria will be used to determine what the client will receive. Here we set no criteria so by default all clients will receive everything. The publishes method indicates the value of the criteria for the update of the specified entity. Here again we set nothing so every update will be pushed to everyone.
    Here is a more interesting example :
    public class AddressBookParams implements DataTopicParams {

    public void observes(DataObserveParams params) {
    params.addValue("user", Identity.instance().getCredentials().getUsername());
    params.addValue("user", "__public__");
    }

    public void publishes(DataPublishParams params, Object entity) {
    if (((AbstractEntity)entity).isRestricted())
    params.setValue("user", ((AbstractEntity)entity).getCreatedBy());
    else
    params.setValue("user", "__public__");
    }
    }
    The observes method indicates that we are interested in getting all updates marked public or made by the current user (all values are appended with a OR operator to the client selector). The publishes method defines the user parameter when the entity is marked as restricted. All this means that a client will receive only public updates or updates made by himself on its own private entities. It's possible to use as many criteria parameters as you want, just ensure that observes and publishes are consistent.

  • Once all this server-side configuration is done, there is still to define a client-side data observer to receive the updates :
    Tide.getInstance().addComponent("myTopic", DataObserver);
    Tide.getInstance().addEventObserver("org.granite.tide.login", "myTopic", "subscribe");
    Tide.getInstance().addEventObserver("org.granite.tide.logout", "myTopic", "unsubscribe");
    This just registers a DataObserver component with the same name as the topic. The events are used to automatically subscribe/unsubcribe the observer on user login/logout.


  • It's a relatively complex setup but once done you don't have anything else to do to automatically get all clients transparently updated when any user modifies something.


    Now that you have this working, you will probably try to update the same entity from two different browsers and see that the result in the database is unpredictable. GraniteDS 2.1 comes with a conflict handling mechanism that should help with these cases. The main requirement is to enable optimistic locking on your JPA entities with a numeric @Version field.

    Then you just have to define a conflict handler on the global context with :
    private function init():void {
    Tide.getInstance().getContext().addEventListener(TideDataConflictsEvent.DATA_CONFLICTS, conflictsHandler);
    }

    private var _conflicts:Conflicts;

    private function conflictsHandler(event:TideDataConflictsEvent):void {
    _conflicts = event.conflicts;
    Alert.show("Someone else has modified the entity you are currently working on.\nDo you want to keep your modifications ?",
    "Modification conflict", Alert.YES | Alert.NO, null, conflictsCloseHandler);
    }

    private function conflictsCloseHandler(event:CloseEvent):void {
    if (event.detail == Alert.YES)
    _conflicts.acceptAllClient();
    else
    _conflicts.acceptAllServer();
    }


    This is relatively straighforward: a conflict event is dispatched whenever conflicts are detected during merge of the pushed updates. Then it's possible either to keep local changes with acceptAllClient, or to get latest server data with acceptAllServer.

    If you don't use data push, it's still possible to use this conflict handling by detecting server-side OptimisticLockException. All Tide service factory install by default a PersistenceExceptionConverter that understands this exception and translates it to something that can be used on the client.
    On the client, just register the corresponding exception handler with :
    Tide.getInstance().addExceptionHandler(OptimisticLockExceptionHandler);
    Then all optimistic lock errors will be considered as local conflicts and will use the previously described conflict handling mechanism. That will allow the end user to keep its change or get the last data from the server.

    Note that this API is not necessarily final so your feedback would be very welcome to improve it or add missing features.

    jeudi 5 novembre 2009

    New in GraniteDS 2.1.0 RC1: early support for JSR-299 / JCDI

    GraniteDS has almost always had support for EJB3 and JBoss Seam. With the advent of JEE6, support for JSR-299 / JCDI is quite a natural evolution and probably a must have in a not so far future.

    So what's in this first implementation :

  • Tide remoting to JCDI Named components

  • All features supported for EJB3: integration with container security, paging, lazy loading

  • Support for JCDI conversations

  • Support for client-side Flex event observers of JCDI typed events


  • Note that for now it will work only with the Weld implementation, as conversation support requires using some non public JSR-299 API.

    Also the supported containers are for now JBoss 5.2 trunk (available here and GlassFish V3 starting from build 70 (available here). It will probably not work in Tomcat for now.

    The GraniteDS distribution contains a graniteds-tide-jcdi example that can be deployed in any of these application servers.

    Configuration

    The configuration is almost the same as for other server framework integrations and consists in five parts :

  • Add the GDS libraries in WEB-INF/lib : granite.jar, granite-jcdi.jar and granite-hibernate.jar (or granite-eclipselink.jar for GlassFish)

  • Add the AMF (and Gravity if needed) servlets in web.xml

  • Add the following granite-config.xml in WEB-INF/granite :
  • <granite-config scan="true">
    <security type="org.granite.messaging.service.security.TomcatSecurityService"/>

    <tide-components>
    <tide-component instance-of="org.granite.tide.jcdi.JCDIIdentity"/>
    <tide-component annotated-with="org.granite.messaging.service.annotations.RemoteDestination"/>
    </tide-components>
    </granite-config>

  • Configure the Tide JCDI service factory in services-config.xml in WEB-INF/flex :
  • <factories>
    <factory id="tideJcdiFactory" class="org.granite.tide.jcdi.JCDIServiceFactory"/>
    </factories>

  • Add an empty beans.xml in WEB-INF

  • Remoting

    Once this is done, add your named JCDI bean and annotate it with @RemoteDestination :

    @Named("helloWorld")
    @RemoteDestination(id="helloWorld")
    public class HelloWorld {

    public String hello(String name) {
    return "hello" + name;
    }
    }

    Then you can easily call it from Flex using Tide remoting and injection :

    <mx:Application
    xmlns:mx="http://www.adobe.com/2006/mxml"
    xmlns="*"
    preinitialize="Jcdi.getInstance().initApplication()">

    <mx:Script>
    <![CDATA[
    import org.granite.tide.jcdi.Jcdi;
    import org.granite.tide.Component;

    [In]
    public var helloWorld:Component;
    ]]>
    </mx:Script>

    <mx:Button label="Hello" click="helloWorld.hello('Barack')"/>

    </mx:Application>

    You can even use typesafe client proxies (e.g. public var helloWorld:HelloWorld) if you have generated them with gas3. Maybe in RC2 we'll try to use completely typesafe service invocation and will not require @Named beans any more.

    Events

    Support for events is relatively similar to what exists for Seam, but with JCDI it uses typesafe events.
    Define your Java and as3 event classes (in the final release it will be possible to generate the as3 event class automatically with gas3) :
    public class GreetingEvent {
    private String name;

    public GreetingEvent(String name) {
    this.name = name;
    }
    public String getName() {
    return name;
    }
    public void setName(String name) {
    this.name = name;
    }
    }
    [RemoteClass(alias="test.app.GreetingEvent")]
    public class GreetingEvent extends AbtractTideEvent {
    public var name:String;
    }

    Fire an event from the server method :
    @Named("helloWorld")
    @RemoteDestination(id="helloWorld")
    public class HelloWorld {

    @Inject @Any
    Event greetingEvent;

    public String hello(String name) {
    greetingEvent.fire(new GreetingEvent(name));
    return "hello" + name;
    }
    }

    Then just declare a remote observer in the Flex application and it will be triggered whenever the event is dispatched during a remote call initiated from Flex.
    <mx:Application
    xmlns:mx="http://www.adobe.com/2006/mxml"
    xmlns="*"
    preinitialize="Jcdi.getInstance().initApplication()">

    <mx:Script>
    <![CDATA[
    import org.granite.tide.jcdi.Jcdi;
    import org.granite.tide.Component;

    [In]
    public var helloWorld:Component;

    [Observer(remote="true")]
    public function greet(event:GreetingEvent):void {
    trace("Greeting to " + event.name);
    }
    ]]>
    </mx:Script>

    <mx:Button label="Hello" click="helloWorld.hello('Barack')"/>

    </mx:Application>


    This is really just an early implementation of this integration and it will be updated for the final release of the JCDI specification and RI.

    Our feeling is that JCDI is a perfect fit for Flex RIAs with an event-driven architecture. JCDI applications looks extremely clean and even JBoss Seam provides a lot more features, they do not necessarily make sense with a RIA front-end.

    Feel free to give some feedback and maybe some ideas for this integration.

    New in GraniteDS 2.1.0 RC1: new features of the gas3 generator

    Typesafe proxies


    One of the very nice new features in GraniteDS 2.1 has been contributed by Francesco Faraone and Saverio Trioni.

    If you have already used RemoteObject or the Tide Component/Object API to access remote services, you most likely already have noticed that neither of these options are typesafe.
    What this means is that you can't have code completion in your Flex IDE, and that you can easily make a mistake in either the remote method name or its arguments.

    With GDS 2.1, the gas3 generator is now able to generate typesafe client proxy classes from Java service classes or interfaces. While it can work with service implementations, it's much better to generate the client proxies from service interface when possible. Let's see how this works with the gas3 ant task :

    <target name="generate.as3" depends="define.gas3"
    description="Generate AS3 beans and proxies for example entities and services">

    <gas3 outputdir="flex">
    <classpath>
    <pathelement location="classes"/>
    <path dir="lib"/>
    </classpath>
    <fileset dir="classes">
    <include name="com/myapp/entities/**/*.class"/>
    </fileset>
    <fileset dir="classes">
    <include name="com/myapp/services/**/*Service.class"/>
    </fileset>
    </gas3>
    </target>


    As you can see, this is no different from generating as3 entity beans, just include the interface classes in the generator fileset.

    It's not the only thing to do, because the generator needs to know that is has to generate a client proxy for our interface and not only an as3 interface. So you have to annotate your service interface with @RemoteDestination(id="myService"). If you use GraniteDS for remoting, that should be generally already the case. Here's an example service interface :

    @RemoteDestination(id="personService")
    public interface PersonService {

    public Person createPerson(Person person);

    public Person modifyPerson(Person person);

    public void deletePerson(Integer personId);
    }


    When generating the client for this interface, you will get a PersonService as3 class that extends RemoteObject and can be used exactly as a RemoteObject :

    var personService:PersonService = new PersonService();
    personService.addOperationListener(personService.modifyPerson, ResultEvent.RESULT, handlerFunction);


    This proxy generator can also be used with the Tide remoting API with the option tide="true". You then will be able to use typesafe service proxies either declared manually :

    Tide.getInstance().addComponent("personService", PersonService)

    PersonService(tideContext.personService).modifyPerson(person, modifyResult)

    Or much easier, using implicit declaration and injection :

    [In]
    public var personService:PersonService;

    personService.modifyPerson(person, modifyResult);


    Note that since the generator requires the annotation @RemoteDestination to identity service interface, it's better to use it than @TideEnabled if you want to use typesafe proxies, even if it requires an unused id attribute.

    The service generation can also be done with the Eclipse builder plugin, in this case just add the service interfaces classes in the 'Java Sources' section of the plugin properties page.


    Generation of flex-config.xml


    Another very frequent cause of errors with AMF objects serialization/deserialization comes from the Flex compiler not including all classes in the compiled SWF because they are not referenced anywhere in the code.
    The fix generally consists in adding dummy variables of the missing type, but this is very tedious and it is very easy to forget one.
    It would be a lot easier if the Flex compiler had an option to always include all classes in a source directory (don't hesitate to vote for the following feature request on the Adobe Flex JIRA) but as long as this is not the case, we felt the need to provide something similar ourselves.

    So there is a new option in the gas3 Eclipse builder plugin that automatically builds a flex-config.xml in the root folder of the project including all as3 files from the current source path.


    Then you just have to add the following compiler option :

    -load-config += flex-config.xml

    And you can say goodbye to problems with missing classes.


    Custom entity factory


    If you use the gas3 ant task, you maybe know that it's already possible to define custom templates for all kinds of generated elements and in particular for entity classes with attributes like entitytemplate="blah.gsp" and entitybasetemplate="blahbase.gsp".

    However your custom templates are still limited to use what is provided by the gas3 entity reflection factory. For example it's not easily possible to generate custom as3 annotation from existing Java annotations.
    To allow this, you can now define a custom implementation of EntityFactory that will build a custom instance of JavaEntityBean where you could parse and store whatever information you need from the Java class.

    For example you could build a HVEntityFactory that reads Hibernate Validator 3 annotations to generate custom constraint annotations in the as3 entity class. You could do this with :

    <gas3 entityfactory="com.myapp.MyEntityFactory"
    entitybasetemplate="file:///C:/myapp/myEntityBase.gsp"/>

    mercredi 4 novembre 2009

    New in GraniteDS 2.1.0 RC1: simplified configuration for Seam and Spring

    Hi all,

    Starting a new Flex + GraniteDS + Seam/Spring project or 'granitizing' an existing project is not a very complex task but involves quite a few configuration files and makes hard to get started for new users.

    Following the releases of the Spring-BlazeDS project and the beginning of the Seam-BlazeDS integration, we have implemented a similar mechanism that in most cases requires only one line of specific server configuration for GraniteDS.

    Let's start by Seam :

    The setup of a Seam + GraniteDS project used to require changes or additions of web.xml, components.xml, granite-config.xml and services-config.xml.

    With GDS 2.1, all you need is to add the GDS libraries in WEB-INF/lib or ear/lib and modify components.xml :

    <components xmlns="http://jboss.com/products/seam/components"
    xmlns:core="http://jboss.com/products/seam/core"
    xmlns:security="http://jboss.com/products/seam/security"
    xmlns:transaction="http://jboss.com/products/seam/transaction"
    xmlns:persistence="http://jboss.com/products/seam/persistence"
    xmlns:framework="http://jboss.com/products/seam/framework"
    xmlns:bpm="http://jboss.com/products/seam/bpm"
    xmlns:jms="http://jboss.com/products/seam/jms"
    xmlns:web="http://jboss.com/products/seam/web"
    xmlns:graniteds="http://www.graniteds.org/config"
    xmlns:xsi="http://www.w3.org/2001/XMLSchema-instance"
    xsi:schemaLocation=
    "http://jboss.com/products/seam/core http://jboss.com/products/seam/core-2.0.xsd
    http://jboss.com/products/seam/transaction http://jboss.com/products/seam/transaction-2.0.xsd
    http://jboss.com/products/seam/persistence http://jboss.com/products/seam/persistence-2.0.xsd
    http://jboss.com/products/seam/web http://jboss.com/products/seam/web-2.0.xsd
    http://jboss.com/products/seam/jms http://jboss.com/products/seam/jms-2.0.xsd
    http://jboss.com/products/seam/security http://jboss.com/products/seam/security-2.0.xsd
    http://jboss.com/products/seam/bpm http://jboss.com/products/seam/bpm-2.0.xsd
    http://jboss.com/products/seam/components http://jboss.com/products/seam/components-2.0.xsd
    http://jboss.com/products/seam/framework http://jboss.com/products/seam/framework-2.0.xsd
    http://www.graniteds.org/config http://www.graniteds.org/config/granite-config-2.1.xsd">


    <core:init jndi-pattern="myapp/#{ejbName}/local" debug="true"/>

    <core:manager concurrent-request-timeout="500"
    conversation-timeout="120000" conversation-id-parameter="cid" parent-conversation-id-parameter="pid"/>

    <persistence:entity-manager-factory name="ejb3" persistence-unit-name="ejb3"/>

    <persistence:managed-persistence-context name="entityManager" entity-manager-factory="#{ejb3}"/>

    <security:identity jaas-config-name="other"/>


    <graniteds:flex-filter url-pattern="/graniteamf/*" tide="true"/>

    </components>

    The important part is the flex-filter declaration. It allows to map an url-pattern (in most cases /graniteamf/* is a good default value) to the GraniteDS AMF request processor. The attribute tide="true" defines a Tide/Seam service factory, otherwise this will be a simple Seam service factory.
    This configuration assumes that the Seam filter is mapped in web.xml to /*, which is the case for Seam projects generated by seam-gen or by the Eclipse Seam tools.

    Note that if you need to use Gravity, you still will have to declare manually the Gravity servlet in web.xml and change the filter mapping for SeamFilter. This is because the declaration depends on the servlet container and SeamFilter cannot be used with most container comet implementations (in particular Tomcat 6 CometProcessor).


    Now Spring :

    No big surprise, this is almost exactly the same for Spring, except of course that this time it assumes that a Spring MVC DispatcherServlet is mapped, so there is still some changes in web.xml if you don't have one :

    web.xml :
    <servlet>
    <servlet-name>dispatcher</servlet-name>
    <servlet-class>org.springframework.web.servlet.DispatcherServlet</servlet-class>
    <load-on-startup>1</load-on-startup>
    </servlet>
    <servlet-mapping>
    <servlet-name>dispatcher</servlet-name>
    <url-pattern>/graniteamf/*</url-pattern>
    </servlet-mapping>

    applicationContext.xml :
    <beans
    xmlns="http://www.springframework.org/schema/beans"
    xmlns:xsi="http://www.w3.org/2001/XMLSchema-instance"
    xmlns:aop="http://www.springframework.org/schema/aop"
    xmlns:tx="http://www.springframework.org/schema/tx"
    xmlns:context="http://www.springframework.org/schema/context"
    xmlns:graniteds="http://www.graniteds.org/config"
    xsi:schemaLocation="
    http://www.springframework.org/schema/beans http://www.springframework.org/schema/beans/spring-beans-2.0.xsd
    http://www.springframework.org/schema/context http://www.springframework.org/schema/context/spring-context-2.5.xsd
    http://www.springframework.org/schema/tx http://www.springframework.org/schema/tx/spring-tx-2.0.xsd
    http://www.springframework.org/schema/aop http://www.springframework.org/schema/aop/spring-aop-2.0.xsd
    http://www.graniteds.org/config http://www.graniteds.org/config/granite-config-2.1.xsd">

    <context:component-scan base-package="com.myapp.service" />

    <tx:annotation-driven transaction-manager="transactionManager"/>

    ...

    <graniteds:flex-filter url-pattern="/*" tide="true"/>

    </beans>

    The configuration is very similar to the one for Seam, except that the url-pattern is this time relative to the url-mapping of the Spring DispatcherServlet. This is also very similar to the configuration for Spring-BlazeDS.

    It is also possible to share an existing DispatcherServlet between a Web/Spring MVC and a GraniteDS/Flex front-ends, only the Flex channel endpoint url will be different (for example http://myserver/myapp/spring/graniteamf/amf instead of http://myserver/myapp/graniteamf/amf).


    In these two new configurations, there is no need for services-config.xml or granite-config.xml, however you can add one for more detailed configuration options.


    The absence of service-config.xml means that the RemoteObject channels can not be defined during the compilation of the Flex application. That means that it will be necessary to provide them manually :

    <mx:Application
    xmlns:mx="http://www.adobe.com/2006/mxml"
    xmlns="*"
    xmlns:cs="test.granite.components.*"
    layout="vertical"
    backgroundGradientColors="[#0e2e7d, #6479ab]"
    preinitialize="preinit()">

    <mx:Script>
    <![CDATA[
    private var graniteChannelSet:ChannelSet;

    private function preinit():void {
    Spring.getInstance().initApplication();

    graniteChannelSet = new ChannelSet();
    graniteChannelSet.addChannel(new AMFChannel("graniteamf", "http://{server.name}:{server.port}/myapp/graniteamf/amf"));

    Spring.getInstance().remoteObjectInitializer = function(ro:RemoteObject):void {
    ro.channelSet = graniteChannelSet;
    };

    }
    ]]>
    </mx:Script>
    ...
    </mx:Application>

    This a bit more complex that simply using services-config.xml, but that also means that you can dynamically configure the channel set, for example using the technique described here.


    This new Seam/Spring configuration can handle a few options that were only in granite-config.xml before :

    <graniteds:flex-filter url-pattern="/*" tide="true">
    <graniteds:tide-annotations>
    <graniteds:value>org.springframework.stereotype.Controller</graniteds:value>
    </graniteds:tide-annotations>
    <graniteds:exception-converters>
    <graniteds:value>com.myapp.util.MyExceptionConverter</graniteds:value>
    </graniteds:exception-converters>
    </graniteds:flex-filter>


    Messaging destinations that were previously declared in services-config.xml can now also be declared in components.xml or applicationContext.xml :

    Simple messaging destination :
    <graniteds:messaging-destination 
    name="addressBookTopicDestination"
    id="addressBookTopic"
    no-local="true"
    session-selector="true"/>


    JMS topic destination :
    <graniteds:jms-topic-destination id="addressBookTopic"
    name="dataTopic"
    connection-factory="ConnectionFactory"
    jndi-name="topic/testTopic"
    acknowledge-mode="AUTO_ACKNOWLEDGE"
    transacted-sessions="true"
    no-local="true"
    session-selector="true"/>


    Hopefully these new configuration options will make easier for new users to get started with GraniteDS and maybe for Spring-BlazeDS users to easily switch to GraniteDS if they want to.

    mardi 25 août 2009

    Build a Flex CRUD application in 15 minutes with the Grails GraniteDS plugin

    A few month ago, I've shown how to build a simple CRUD application with Flex, Grails and the GraniteDS plugin. That was not overly complex but there was still room for improvement in the quantity of code that was needed to make things work.
    Grails itself provides a feature called scaffolding that allows to build extremely easily a simple working application skeleton from constraints defined on the domain classes.

    Doing the same with Flex is a bit more complex because there are two runtimes involved: the Flash client and the Java server. There are thus three main possible options:

  • Generation and compilation of static Flex code on the server. Its advantages are static typing and full customizability. Its drawbacks are the quantity of code to maintain (even if it's generated, it's still here) and a relative difficulty to do incremental development (once the generated app has been customized, it's harder to update it when the source model changes). This is the option taken by the GFS plugin for example.

  • Dynamic generation of domain metadata on the server used by a Flex framework to build the UI dynamically. This has the big advantage of being completely driven by the server, so changes on the domain classes are immediately visible on the UI without requiring a recompilation of the client, and moreover there is relatively little client code. The corresponding drawback is that the generated application is not typed (client side data would be represented as XML for example) and is more difficult to maintain and customize.

  • Generation of a static Flex domain model and dynamic generation of the Flex UI. This is the approach taken by the GraniteDS plugin, its advantages are a limited amount of client code and a strongly typed client application. The drawbacks are that it's less dynamic than option 2 (changes on the Grails domain class require a recompilation of the Flex application), and less easily customizable than option 1.


  • After this short introduction, let's see how this works with the latest release of gdsflex (0.7.1).

    First we create a new Grails application, once again a book manager (maybe next time I'll find some more original example). Assuming you have grails 1.1.1 installed, type from the command line :

    grails create-app gdsexample2

    cd gdsexample2

    grails install-plugin gdsflex


    As before, the main part is to define the domain model. Let's start this time by a simple Author class.

    grails create-domain-class com.myapp.Author

    Author.groovy

    package com.myapp

    class Author {

    static constraints = {
    name(size:0..50, blank:false)
    birthDate(format:'DD/MM/YYYY')
    picture(nullable:true, widget:'image')
    }

    String uid

    String name

    Date birthDate

    java.sql.Blob picture
    }

    This is a relatively simple domain class, you can notice the constraints that drive Grails scaffolding. So let's add a simple controller :

    grails create-controller com.myapp.Author

    AuthorController.groovy

    package com.myapp

    @org.granite.tide.annotations.TideEnabled
    class AuthorController {

    def index = { redirect(action:list, params:params) }

    def scaffold = Author
    }

    Then run :

    grails generate-flex-app

    grails mxmlc

    grails run-app

    And go to http://localhost:8080/gdsexample2/gdsexample2.swf.

    You should have a basic working Flex application that allows to create and edit authors. So what happened here :

  • The gas3 generator has generated ActionScript 3 classes for each domain class (as that was the case before), this time incuding the existing Grails constraints.

  • A new scaffolding template for controllers has been installed in src/templates/scaffolding that includes the necessary actions for the Flex application.

  • The Flex UI builder classes (org.granite.tide.uibuilder) have been installed in grails-app/views/flex.

  • A main mxml has been generated in grails-app/views/flex/gdsexample2.mxml that includes a menu to access all domain classes.


  • This is a simple example, but we can see how the constraints have been used : the Grails constraints in Author.groovy have been translated to the following block in Author.as :

    public static const meta_constraints:Array = [
    { property: "name",
    blank: "false", size: "0..50"
    },
    { property: "birthDate",
    format: "DD/MM/YYYY"
    },
    { property: "picture",
    widget: "image"
    }
    ]

    Even if you don't want to use the GraniteDS UI builder framework, you could still use these as3 constraints from any custom framework.

    You can check that the blank and size constraints have been mapped to Flex client-side validators, and that the date format has been used in the author table. The 'image' widget is simply a component that appears in edit mode and allows to upload an image from Flex.

    Now that we have seen a basic domain class, let's see how it works with associations.

    grails create-domain-class com.myapp.Book

    grails create-domain-class com.myapp.Chapter

    grails create-controller com.myapp.Book

    Book.groovy

    package com.myapp

    class Book {

    static constraints = {
    title(size:0..100, blank:false)
    category(inList:["Fiction", "Non-fiction", "Biography"])
    author()
    description(size:0..2000, widget:"textArea")
    chapters()
    }

    String uid

    String title

    String category

    Author author

    Set chapters

    String description

    static hasMany = [ chapters:Chapter ]
    static mapping = {
    author fetch:"join"
    chapters cascade:"all-delete-orphan"
    }
    }

    Chapter.groovy

    package com.myapp

    class Chapter {

    static constraints = {
    title(size:0..50, blank:false)
    }

    String uid

    Book book

    String title

    String summary

    static mapping = {
    book fetch:"join"
    }
    }

    BookController.groovy

    package com.myapp

    @org.granite.tide.annotations.TideEnabled
    class BookController {

    def index = { redirect(action:list, params:params) }

    def scaffold = Book
    }

    An important thing is that ManyToOne associations must be marked fetch:"join" or lazy:false. GraniteDS does not support transparent lazy loading for single ended associations, and most likely never will (it would generate unacceptable network and database traffic, one http request and one SQL query for each uninitialized entity). Lazy collections are supported, so OneToMany and ManyToMany associations do not have to be marked lazy:false.

    Let's regenerate the Flex application to add the Book menu to the main mxml.

    grails generate-flex-app

    grails mxmlc


    You can notice that the main mxml has been overwritten. This is quite annoying if you made some changes to the generated file but the previous file is backuped and in general you would have added the entity manually in the mxml. If you have a look to the mxml, only two lines have been added for the new entity :

    <mx:LinkButton label="Books" width="100%" textAlign="left"
    click="mainStack.selectedChild = bookUI" />


    <ui:EntityUI id="bookUI"
    entityClass="{Book}"
    width="100%" height="100%"/>

    The EntityUI is a Flex component and can just be used anywhere in a Flex application (provided the Tide framework initialization has been done correctly).

    We can now create and edit books, and see how many-to-one and one-to-many associations are displayed in the generated application.

    As you eventually tried to add chapters, you will see that it does not work. There are indeed two minor changes to do manually in the AS3 classes to help the UI builder make the link between the associated oneToMany entities: initialize the Chapters collection in the Book.as class, and add a constructor in Chapter.as :

    public function Book():void {
    chapters = new ArrayCollection();
    }


    public function Chapter(book:Book = null):void {
    this.book = book;
    }

    Once these changes are made, just refresh the browser and check that you can add chapters to your books.

    Now we're almost finished, we'll just add a final improvement to this simple app:

    grails html-wrapper

    As the command name indicates, this will generate a html wrapper and allow the application to use Flex deep linking, and to use Grails url mapping on the flex application now located at flexindex.gsp.

    Now you can go to http://localhost:8080/gdsexample2/flexindex.gsp#book/list to access the book list directly.

    The documentation on the plugin page gives more information on what constraints are supported by the builder and how to override the behaviour of the generated application. Anyway the sources of the UI builder are also present in the grails-app/views/flex folder and can be used as a template to build your customized UI.

    It should be easy to add security and data push to the generated application by following the previous blog entry here.

    Hopefully this new feature of the gdsflex Grails plugin is a useful tool to get started quickly with Flex and GraniteDS and to quickly build prototype applications.
    As always, feedback and comments are welcome.

    mercredi 20 mai 2009

    What's New in GraniteDS 2.0.0 RC1


    Main New Features
    :

    Granite Data Services 2.0.0 Release Candidate 1 has just been released and comes with four main new features:
    1. Google App Engine support: GDS applications may now be deployed on Google's infrastructure. See details in William's related posts on this blog.
    2. Servlet 3.0 preview: Gravity now implements data push with Servlet 3.0 API and may be tested with Glassfish v3 preview (lastest promoted builds only). See below for details.
    3. Configuration MBeans: you may now use your JMX console in order to manage several GraniteDS options and watch for runtime configuration details. See below for details.
    4. JDO annotations support: Gas3 now generates suitable ActionScript3 code for JDO annotated entities and the DataNucleusExternalizer takes care of JDO's specific annotations.
    Granite-config.xml Changes (MUST READ):

    The granite-config.dtd has changed in order to make the config more readable: as a general rule, all configuration attributes use now a "dashed" convention: "annotedwith" is now spelled "annotated-with", "instanceof" "instance-of", etc. There is also a new "gravity" section whose meaning content is detailed in "Gravity Changes" below.

    The new DTD is online here and will help you with a DTD aware XML editor.

    Gravity Changes:

    Gravity code was getting messy, with several duplicated source sections, and hard to maintain. With the addition of Servlet 3.0 and GAE support, things were going even more harder, so the code has been cleaned up and widely refactored. However, the new code has been fully tested and shouldn't bring any problem.

    A new feature in this rewriting is the use of a thread pool for publishing messages. Previously, a published message was delivered to subscribed channels in a synchronous way, using the publish request container thread (delivering means only duplicating the message for all channels subscribed to the message's topic and adding each copy to each channel's queue). This operation was potentially time consuming with a large number of channels connected to the same topic and could block the caller container thread for a significant amount of time. A thread pool is now used for that purpose in all servlet implementations (Tomcat, JBossWeb, Jetty and Servlet 3.0) except for GAE.

    Instead of servlet parameters, Gravity configuration now goes in a dedicated section of granite-config.xml. Here is an example of all options with there default values:

    <gravity
    factory="org.granite.gravity.DefaultGravityFactory"
    channel-idle-timeout-millis="1800000"
    long-polling-timeout-millis="20000"
    reconnect-interval-millis="30000"
    reconnect-max-attempts="60">

    <thread-pool
    core-pool-size="5"
    maximum-pool-size="20"
    keep-alive-time-millis="10000"
    queue-capacity="2147483647" />

    </gravity>

    This section is purely optionnal and you may omit it if you accept default values. Full documentation will be provided later but here is some comments on the most important options:
    • channel-idle-timeout-millis: the elapsed time after which an idle channel (pure producer or dead client) may be silently unsubcribed and removed by Gravity. Default is 30 minutes.
    • long-polling-timeout-millis: the elapsed time after which an idle connect request is closed, asking the client to reconnect. Default is 20 seconds. Note that setting this value isn't supported in Tomcat/APR configurations.
    • thread-pool attributes: all options are standard parameters for the Gravity ThreadPoolExecutor instance.
    You may also use the new Gravity MBean in order to change most of these options at runtime (see below).

    Servlet v3 support is new in this RC1 and should be considered as beta software. The only up-to-date implementation of the new API at this time is in Glassfish v3 trunk and you may download it here (Servlet 3.0 support has been tested with glassfish-v3-preview-b47-windows.exe and may or may not work with other builds).

    Configuring the GDS chat sample for Glassfish v3 is a two steps process:
    1. Edit the graniteds/examples/env.properties and set SERVER_HOME to your glassfishv3/glassfish directory and SERVER_HOMER_DEPLOY to ${SERVER_HOME}/domains/domain1/autodeploy.
    2. Copy the content of the graniteds/examples/graniteds_chat/resources/WEB-INF/servlet3-web.xml into the web.xml file. Then, use the "deploy" target of chat build file and start Glassfish (see Glassfish documentation).
    You should then be able to connect to http://localhost:8080/graniteds-chat/ and test the application.

    Configuration MBeans:

    This RC1 comes with two new MBeans for GDS runtime management:
    • GraniteConfig MBean: this mbean will show an almost complete configuration state of GDS at runtime, with several things that were not accessible previously (except with a debugger): externalizers used so far, associated with serialized classes, enabled or disabled Tide components, etc. The only available operation provided by this MBean is a reload button: it will re-read your deployed granite-config.xml file and take care of your modifications. Note that everything may not be reconfigured at runtime but this may be at least a great tool for finding issues, for example, with externalizers configuration.
    • GravityConfig MBean: this mbean will display the current state of Gravity, letting you modify at runtime timeouts and pool sizing. You'll be also able to restart Gravity: note however that this is only an emergency feature because all undelivered queued messages will be lost!
    To access these MBeans with JBoss, browse to http://localhost:8080/jmx-console and scroll to the "org.granite" section.

    GraniteDS 2.0 now supports server push on Google App Engine

    We are close to releasing GraniteDS 2.0 RC1, hopefully the last release before GA. It includes a big refactoring of the Gravity core to simplify the implementation of new providers, and in particular there is a new Gravity provider for Google App Engine based on Memcache.

    An example of this Google App Engine push implementation is available at http://gdsgaepush.appspot.com, once again with admin/admin or user/user. If you open two browsers on the application, the changes made on from side should be also updated on the other. The eclipse project can be downloaded here.

    The GAE environment is very interesting because it is fully clustered: each request can be unpredictably handled by a different server instance. The only reliable way to communicate between different requests/users is by using the datastore or memcache (or a combination of both). In a first messaging implementation, we have chosen the memcache API that allows fast communication between processes and is easy to use. The main drawback is that it is not a reliable store and that client subscriptions or messages could be lost under high memory usage, but for non critical use it might be acceptable.

    The implementation is relatively simple: Gravity subscriptions and channels are stored in the cache with a configurable expiration delay. Each channel maintains its current number of pending messages in the cache. Publisher threads just increment this number and store new messages in the cache, and subscriber threads poll the channel counter at regular intervals and get existing messages from the cache when there are available. The poller thread by default polls the channel every 500ms and has a total duration of 20s (under the 30s limit of GAE).

    It's important to note that due to the use of memcache, only serializable objects can be sent in Gravity messages (but it's also the case with JMS). Besides that simple limitation, all features of Gravity (client <-> client, server -> client, selectors, ...) can be used with GAE (see documentation here).

    The configuration of the GAE provider can be done as follows :

  • Define the Gravity GAE servlet in WEB-INF/web.xml :
  • <servlet>
    <servlet-name>GravityServlet</servlet-name>
    <servlet-class>org.granite.gravity.gae.GravityGAEServlet</servlet-class>
    <load-on-startup>1</load-on-startup>
    </servlet>
    <servlet-mapping>
    <servlet-name>GravityServlet</servlet-name>
    <url-pattern>/gravityamf/*</url-pattern>
    </servlet-mapping>

  • Setup the GAE Gravity factory in WEB-INF/granite/granite-config.xml :
  • <gravity 
    factory="org.granite.gravity.gae.GAEGravityFactory
    channel-idle-timeout-millis="1800000">
    <configuration>
    <gae polling-interval="500">
    </configuration>
    </gravity>

  • Finally define the GAE service adapter in WEB-INF/flex/services-config.xml :
  • <service id="gravity-service"
    class="flex.messaging.services.MessagingService"
    messageTypes="flex.messaging.messages.AsyncMessage">
    <adapters>
    <adapter-definition id="gae" class="org.granite.gravity.gae.GAEServiceAdapter"/>
    </adapters>

    <destination id="exampleDestination">
    <channels>
    <channel ref="my-gravityamf"/>
    </channels>
    <adapter ref="gae"/>
    </destination>
    </services>

    This new server push provider complements the current existing support for AMF remoting and JDO persistence and makes GraniteDS 2.0 a complete platform for deploying Flex applications on Google App Engine.

    As always, feedback and comments are welcome.

    lundi 20 avril 2009

    GraniteDS 2.0 on Google App Engine

    Google App Engine is the buzzword of the week for Java developers, so of course we have tried to make GraniteDS 2.0 work on it.

    After fixing a few issues we managed to have an application working correctly, that you can see at http://gdsgae.appspot.com (log in with admin/admin or user/user). The application is relatively simple, but it demonstrates a complete integration between GraniteDS, Spring MVC and JDO/DataNucleus. The Eclipse project can be downloaded here.

    Having a working environment in the local development server has been quite easy, but two bugs in the GAE production environment prevented GDS to work correctly. First there is a bug in XML/XPath support (GAE 1255) that we use for configuration parsing, and we had to add support for Xalan as an alternative XPath provider. Second there is a bug in request.getInputStream (GAE 1339) that throws EOFExceptions and that we could work around by buffering the stream in the AMF servlet.

    So the first good news is that the latest GraniteDS 2.0 snapshot perfectly works in GAE if you add xalan.jar and serializer.jar (from the Apache Xalan distribution) in your WEB-INF/lib folder.

    Then by pure coincidence we had been working lately on JDO and DataNucleus support in GDS (thanks a lot to Stephen More for his work on it) so it was natural to try it with the GAE datastore. The second good news is that GraniteDS fully supports JDO detached objects from GAE, and that all Tide features can work with JDO annotated entities (including lazy loading).
    There seem to be a lot of bugs in the GAE persistence support though when not using Key objects as entity ids. So we have added the GAEKeyConverter that can serialize GAE keys to strings in ActionScript, and support can be configured in granite-config.xml with :
    <converters>
    <converter type="org.granite.messaging.amf.io.convert.impl.GAEKeyConverter"/>
    </converters>

    JDO annotated entities has also been implemented in the GDS Eclipse builder to generate AS3 classes from a JDO model and it works with the Google Eclipse plugin. If you also use Flex Builder, it's recommended to setup the order or the builders in the project properties as follows: Java, GraniteDS, Enhancer, Flex, GAE Project validator, GAE Webapp validator.

    So we're happy to be able to add Google App Engine to the list of the Java platforms supported by GraniteDS, after Tomcat, Jetty, JBoss 4/5, GlassFish V2/V3 and WebLogic.

    mardi 7 avril 2009

    What's new in GraniteDS 2.0

    GraniteDS 2.0 beta 2 has just been released, and is almost feature complete. There will probably be a 2.0 RC adding the only important missing feature (OSGi support), and then we shoud be ready for the final release. This post only describes the most important new features in this release, but this beta 2 also contains a whole lot of bug fixes and improvements since the 1.2 release.

    New packaging

    As stated in the migration notes, the most visible change is the completely new packaging of the libraries and examples. The persistence/lazy loading support has been completely refactored to simplify the support of new JPA/JDO providers. Consequently the Flex swc libraries have no more dependency on the server-side persistence technology. There are now only 2 swcs: 'granite-essentials.swc' that includes the minimal mandatory persistence classes and must be linked with -include-library, and 'granite.swc' which can be linked as a standard Flex library. This new packaging should allow for smaller compiled swfs as the Flex compiler can now decide which classes need to be included. Finally the Tide framework libraries has been merged in the 'normal' GDS libraries, both client side and server side.

    Improved example projects

    The example projects have been improved and are included in the main distribution, in the 'examples' folder. Here is the list of these examples :
    • graniteds_pojo: most simple one with a basic POJO session service and a MXML calling a RemoteObject
    • graniteds_chat: simple chat example demonstrating use of Gravity to handle near real-time communication between Flex clients
    • graniteds_ejb3: simple address book with EJB3/JPA services
    • graniteds_spring: simple address book with Spring/JPA services. Also shows integration with Spring security
    • graniteds_guice: simple CRUD application with Guice/WARP services
    • graniteds_tide_ejb3/graniteds_tide_spring/graniteds_tide_seam: same address book with EJB3/JPA, Spring/Hibernate or Seam/JPA. Shows the Tide client framework, paged collections, lazy loading, client-side authorization integration and multiuser data updates (you can see it by opening different browser on the application). The Seam example uses the new typed event model of GDS 2.0. The Tide/EJB3 and Tide/Spring examples now have a deployment configuration that allow to deploy them in GlassFish V2 with the TopLink JPA provider.
    • seam_flexbooking: completely rewritten example that exactly reproduces the look and behaviour of the original Seam example. Shows the use of the Tide client framework, and use of client-side conversations integrated with Seam conversations. This is the most advanced example for demonstrating the tight integration with Seam.
    Support for more server platforms

    The core GraniteDS supports new JPA providers and application servers. More specifically GlassFish V2 and V3 with Hibernate or TopLink/EclipseLink are now viable deployment platforms, even without specific Gravity integration.
    JPA provider integration :
    • Hibernate
    • TopLink
    • EclipseLink
    • OpenJPA (new in 2.0)
    • DataNucleus/JPOX (new in 2.0)
    Security integration :
    • Tomcat 6
    • Jetty 6
    • JBossWeb (with the Tomcat security service)
    • WebLogic (new in 2.0)
    • GlassFish V2
    • GlassFish V3 (new in 2.0)
    Gravity server push :
    • Tomcat 6 Comet
    • JBoss 5/JBossWeb comet events
    • Jetty 6 continuations
    • Any other application server without comet support with Jetty servlet and jetty-util.jar
    There have been also a lot of improvements in the Tide framework, in the client framework itself and also in the integration with server frameworks.

    Tide/Client framework

    - UI components defined in MXML can now be automatically registered in the Tide context. A preinitialize handler should be defined in the main application and call Seam.getInstance().initApplication() / Spring.getInstance().initApplication() / Ejb.getInstance().initApplication(). The main MXML is then registered in the Tide context and all children MXML annotated with [Name] will be registered automatically in the context with their component name (or with the name provided in the annotation). For example:

    <mx:Application preinitialize="Seam.getInstance().initApplication()">
    <Login id="loginUI"/>
    </mx:Application>

    Login.mxml :
    <mx:Panel xmlns:mx="http://www.adobe.com/2006/mxml">
    <mx:Metadata>
    [Name]
    </mx:Metadata>
    <mx:Script>

    <![CDATA[
    import org.granite.tide.seam.security.Identity;

    [Bindable] [In]
    public var identity:Identity;

    [Bindable]
    public var message:String = null;

    private function tryLogin(username:String, password:String):void {
    identity.username = username;
    identity.password = password;
    identity.login();
    }
    ]]>
    </mx:Script>

    <mx:Text htmlText="<i>(Type in user/user or admin/admin)</i>" textAlign="center"/>

    <mx:Form>
    <mx:FormItem label="Username">
    <mx:TextInput id="username"/>
    </mx:FormItem>
    <mx:FormItem label="Password">
    <mx:TextInput id="password" displayAsPassword="true"
    enter="tryLogin(username.text, password.text);"/>
    </mx:FormItem>
    </mx:Form>

    <mx:Text text="{message}" textAlign="center"/>

    <mx:Button label="Login"
    click="tryLogin(username.text, password.text);"/>
    </mx:Panel>

    Here the Login.mxml will be registered in the Tide context with the name 'loginUI'. That means that it can be injected with the [In] annotation and dispatch Tide events. The name can be overriden with [Name("someName")]. It is also possible to specify a conversation scope with [Name("someName", scope="conversation")], in this case the component will not be registered automatically but will still have to be set in the conversation context with tideContext.someName = theComponent.

    - The Tide framework supports a new typed event model that can be optionally used instead of TideUIEvent/TideUIConversationEvent. Any Flex event can now be dispatched by the UI components, but their types have to be specified in an Event annotation (and of course the Event annotation must be kept in the Flex compiler options).
    <mx:Panel xmlns:mx="http://www.adobe.com/2006/mxml">
    <mx:Metadata>
    [Name]
    [Event(name="login")]
    </mx:Metadata>
    <mx:Script>

    <![CDATA[
    [Bindable]
    public var message:String = null;
    ]]>
    </mx:Script>

    <mx:Text htmlText="<i>(Type in user/user or admin/admin)</i>" textAlign="center"/>

    <mx:Form>
    <mx:FormItem label="Username">
    <mx:TextInput id="username"/>
    </mx:FormItem>
    <mx:FormItem label="Password">
    <mx:TextInput id="password" displayAsPassword="true"
    enter="dispatchEvent(new LoginEvent(username.text, password.text))"/>
    </mx:FormItem>
    </mx:Form>

    <mx:Text text="{message}" textAlign="center"/>

    <mx:Button label="Login"
    click="dispatchEvent(new LoginEvent(username.text, password.text))"/>
    </mx:Panel>

    With the LoginEvent class:
        public class LoginEvent extends Event {

    public var username:String;
    public var password:String;


    public function LoginEvent(username:String, password:String):void {
    super("login", true, true);
    this.username = username;
    this.password = password;
    }

    public override function clone():Event {
    return new LoginEvent(username, password);
    }
    }

    A client component can then register an observer with this event type :
    [Observer("login")]
    public function loginHandler(event:LoginEvent):void {
    ...
    }

    Such events can also trigger client conversations by implementing org.granite.tide.events.IConversationEvent that requires a property getter conversationId (that defines the conversationId and replaces the first argument of TideUIConversationEvent).

    Tide/Seam

    - There have been some improvements in the interactions between Tide client conversations and Seam server conversations. Tide is now able to detect when the conversationId has been changed on the server or when a new conversation has begun. There are also two new client components ConversationList and Conversation that are client counterparts to the Seam components. ConversationList is a list of currently existing Seam conversation and Conversation can be used for example to set a description on the current conversation, in case you need interoperability between Flex-initiated conversations and classic Web-initiated Seam conversations.

    - The client-side status messages has been improved and Tide now supports control specific messages. A client component StatusMessages can be injected and has a messages property (which replaces context.messages) and a controlMessages property that is a map of messages keyed by controlId. A new client-side validator allows to bind such control messages to Flex UI components. A (minor) beneficial side-effect of this change is also that you can now have a context variable named 'messages'.

    These new features are used in the new Seam booking example.

    Tide/Spring/Grails

    Spring integration was relatively lacking in some parts compared to the Seam integration. GDS 2.0 brings many new features in the Tide/Spring integration.

    - Tide/Spring now supports Spring MVC controllers (only annotation-based) besides the existing support for pure services. That allows for easy binding between server-provided data and the Flex application. All model variables returned from a controller's ModelAndView are bound to Tide context variable, and thus can be directly injected and bound to UI components.
    <mx:Application preinitialize="Spring.getInstance().initApplication()">
    <mx:Script>
    [In] [Bindable]
    public var people:ArrayCollection;

    [In]
    public var peopleController:Object;
    </mx:Script>

    <mx:VBox>
    <mx:DataGrid dataProvider="{people}">
    <mx:columns>
    <mx:DataGridColumn dataField="name"/>
    </mx:columns>
    </mx:DataGrid>

    <mx:TextInput id="searchString"/>
    <mx:Button label="Get list" click="peopleController.list({searchString: searchString.text})"/>
    </mx:VBox>
    </mx:Application>

    Spring controller:
    @Controller("peopleController")
    @Transactional
    public class PeopleController {

    protected SessionFactory sessionFactory;

    @Autowired
    public void setSessionFactory(SessionFactory sessionFactory) {
    this.sessionFactory = sessionFactory;
    }

    @Transactional
    @RequestMapping("/people/list")
    public ModelMap createPerson(@RequestParam("searchString") String searchString) {
    List people = sessionFactory.currentSession()
    .createQuery("select p from Person p where p.name like :searchString")
    .setString("searchString", searchString)
    .list();
    return new ModelMap("people", people);
    }
    }

    - The Spring integration has also been extended to support Grails controllers and services. The Grails integration is available as a Grails plugin (plugin page here: http://www.grails.org/plugin/gdsflex). See previous blog entries for a detailed tutorial on the usage of the plugin.

    - Also there is now support for client-side integration with Spring security authorization. The Tide Identity component now has 4 new methods, ifAllGranted, ifAnyGranted, ifNotGranted and hasPermission that can be used to show/hide various parts of the UI depending on the UI rights. The method names are stricly copied from the Spring security JSP tag library. The ifSomethingGranted(roleNames) are straightforward and take a comma separated list of role names. The hasPermission(entity, action) can be used to protect access to individual entities when using Spring security ACLs on the server.
    These new methods require the configuration of a server-side identity component on the Spring context :
    <bean id="identity" class="org.granite.tide.spring.security.Identity"/>

    or to handle ACLs :
    <bean id="identity" class="org.granite.tide.spring.security.AclIdentity"/>


    The last important new feature is the multiuser data update but it's relatively complex and there will be a blog entry about it later.

    lundi 6 avril 2009

    Building a Flex multi-tab CRUD application : adding security and server push

    The first part of this article has described how to build the main application. The goal of this second part is to demonstrate how you can easily add security and collaborative updates to this existing application with the gdsflex 0.3 Grails plugin.

    Before anything, we need to upgrade the previous project to the latest gdsflex plugin release 0.3 with :
    grails install-plugin gdsflex

    The usual way of adding security to a Grails application is to use the Acegi/Spring security Grails plugin. So now we have to setup this plugin.
    grails install-plugin acegi

    grails create-auth-domains User Role Requestmap

    grails generate-manager

    This will install the plugin and generate a set of gsp pages to create roles and users. Now browse http://localhost:8080/gdsexample/role/create, and create 2 roles ROLE_ADMIN and ROLE_USER. Then http://localhost:8080/gdsexample/user/create, and create 2 users admin and user, each one with one of the previously created roles. The names of the roles are important for Spring security and have to start with 'ROLE_'.

    We also have to enable the Spring security integration in the GraniteDS config file:

    web-app/WEB-INF/granite/granite-config.xml, uncomment or add the following line:
    <security type="org.granite.messaging.service.security.SpringSecurityService"/>

    Once this setup is done, we have to define a login page in the Flex application. To do this, we will simply add a ViewStack in the main MXML that will display either the login page or the application depending on the user login state. This ViewStack will be bound to the Tide Identity component that handles user authentication :

    grails-app/views/GDSExample.mxml :
    <?xml version="1.0" encoding="utf-8"?>

    <mx:Application
    xmlns:mx="http://www.adobe.com/2006/mxml"
    xmlns="*"
    layout="vertical"
    backgroundGradientColors="[#0e2e7d, #6479ab]"
    preinitialize="Spring.getInstance().initApplication()">

    <mx:Script>
    <![CDATA[
    import org.granite.tide.spring.Spring;
    import org.granite.tide.validators.ValidatorExceptionHandler;
    import org.granite.tide.spring.Identity;
    import org.granite.tide.events.TideResultEvent;
    import org.granite.tide.events.TideFaultEvent;

    Spring.getInstance().addExceptionHandler(ValidatorExceptionHandler);

    [Bindable] [In]
    public var identity:Identity;


    [Bindable]
    private var message:String;

    private function loginResult(event:TideResultEvent):void {
    message = "";
    }

    private function loginFault(event:TideFaultEvent):void {
    message = event.fault.faultString;
    }
    ]]>
    </mx:Script>

    <mx:ViewStack id="appView" selectedIndex="{identity.loggedIn ? 1 : 0}" width="100%" height="100%">

    <mx:VBox width="100%" height="100%" verticalAlign="middle" horizontalAlign="center" >
    <mx:Panel title="Login"
    horizontalAlign="center"
    verticalGap="0" paddingTop="8" paddingBottom="8"
    xmlns:mx="http://www.adobe.com/2006/mxml">

    <mx:Form>
    <mx:FormItem label="Username">
    <mx:TextInput id="username"/>
    </mx:FormItem>
    <mx:FormItem label="Password">
    <mx:TextInput id="password" displayAsPassword="true"
    enter="identity.login(username.text, password.text, loginResult, loginFault);"/>
    </mx:FormItem>
    </mx:Form>

    <mx:Label text="{message}"/>

    <mx:Button label="Login"
    click="identity.login(username.text, password.text, loginResult, loginFault);"/>
    </mx:Panel>
    </mx:VBox>

    <mx:VBox id="mainUI" width="100%">
    <mx:ApplicationControlBar id="acb" width="100%">
    <mx:Label text="GraniteDS / Grails example" fontSize="18" fontWeight="bold" color="#f0f0f0"/>
    <mx:Button label="Logout" click="identity.logout()"/>
    </mx:ApplicationControlBar>

    <BookUI id="bookUI" width="100%" height="100%"/>
    </mx:VBox>

    </mx:ViewStack>
    </mx:Application>

    As you can see, most of the code we have added is the login form. The authentication is completely handled by the Identity component. Here we make use of its two main methods login / logout and of its loggedIn property that is bindable and is here used to select which view is displayed. We also define a fault handler to display a login error message when the entered credentials are not correct.

    You can check now on http://localhost:8080/gdsexample/GDSExample.swf that only authenticated people can see and change existing data.

    To further refine the security of the application, we could decide that only administrators are allowed to delete books in our database. This can be done server-side with Spring security, but here we'll just see how to modify the UI according to the user access rights. This is not enabled by default in the plugin, we just have to change the plugin settings, and add a GraniteDSConfig.groovy in grails-app/conf:

    grails-app/conf/GraniteDSConfig.groovy :
    graniteConfig {

    springSecurityAuthorizationEnabled = true

    }

    Then we have to make a few changes in the MXML UI to hide the Delete button when the user is not an administrator:

    grails-app/views/BookEdit.mxml :

    import org.granite.tide.spring.Identity;

    [Bindable] [In]
    public var identity:Identity;


    <mx:HBox>
    <mx:Button label="Save" click="save()"/>
    <mx:Button label="Delete"
    enabled="{!create}"
    visible="{identity.ifAllGranted('ROLE_ADMIN')}"
    click="remove()"/>
    <mx:Button label="Cancel" click="cancel()"/>
    </mx:HBox>

    You can check that if you don't log in with a user having the ROLE_ADMIN role, you don't have the Delete button. You should of course also enable server-side Spring security (for example with the @Secured annotation) and define a AccessDeniedExceptionHandler that would catch all security errors to display a uniform message (see the documentation or GDS/Tide/Spring example for more information).
    The Identity component provides 4 bindable boolean methods ifAllGranted, ifNotGranted, ifAnyGranted and hasPermission corresponding to the JSP tags available in the Spring security tag library. The hasPermission is not supported right now by the Grails plugin but it depends on the configuration of Spring security ACLs that itself would probably require a complete article.

    To finish this post, we will add real-time multiuser updates by adding the Gravity push functionality to our application. First we have to enable these functionalities in the plugin settings:

    grails-app/conf/GraniteDSConfig.groovy :
    graniteConfig {

    springSecurityAuthorizationEnabled = true

    gravityEnabled = true

    dataDispatchEnabled = false
    }

    Then we have to define a Gravity channel and topic in the services-config.xml Flex configuration:

    web-app/WEB-INF/flex/services-config.xml:
    <services-config>

    <services>
    <service id="granite-service"
    class="flex.messaging.services.RemotingService"
    messageTypes="flex.messaging.messages.RemotingMessage">

    <destination id="spring">
    <channels>
    <channel ref="my-graniteamf"/>
    </channels>
    <properties>
    <factory>tideSpringFactory</factory>
    <persistenceManagerBeanName>tidePersistenceManager</persistenceManagerBeanName>
    </properties>
    </destination>
    </service>

    <service id="gravity-service"
    class="flex.messaging.services.MessagingService"
    messageTypes="flex.messaging.messages.AsyncMessage">
    <adapters>
    <adapter-definition id="simple" class="org.granite.gravity.adapters.SimpleServiceAdapter"/>
    </adapters>

    <destination id="bookManagerTopic">
    <properties>
    <session-selector>true</session-selector>
    </properties>
    <channels>
    <channel ref="my-gravityamf"/>
    </channels>
    <adapter ref="simple"/>
    </destination>
    </service>
    </services>

    <factories>
    <factory id="tideSpringFactory" class="org.granite.tide.spring.SpringServiceFactory">
    </factory>
    </factories>

    <!--
    ! Declares my-graniteamf channel.
    !-->
    <channels>
    <channel-definition id="my-graniteamf" class="mx.messaging.channels.AMFChannel">
    <endpoint
    uri="http://{server.name}:{server.port}/{context.root}/graniteamf/amf"
    class="flex.messaging.endpoints.AMFEndpoint"/>
    </channel-definition>

    <channel-definition id="my-gravityamf" class="org.granite.gravity.channels.GravityChannel">
    <endpoint
    uri="http://{server.name}:{server.port}/{context.root}/gravityamf/amf"
    class="flex.messaging.endpoints.AMFEndpoint"/>
    </channel-definition>
    </channels>

    </services-config>

    Here we have just added a new channel-definition, gravity-service and topic destination in the configuration, now we have to tell the Flex client and the Grails components to send/receive the data updates on this topic. The server part is relatively simple, we just have to annotate our controllers/services with the DataEnabled annotation:
    @DataEnabled(topic="bookManagerTopic", params=ObserveAllPublishAll.class, publish=DataEnabled.PublishMode.ON_SUCCESS)

    This annotation specifies the topic and has two other important parameters:

    - 'params' defines a publishing selection class. To keep things simple here, we will just write a very simple selection class that allow everyone to observer and publish all updates. For some reason, using Groovy classes in annotations triggers an infinite loop in the Grails compilation, so we will just write a Java class this time:

    src/java/ObserveAllPublishAll.java
    import org.granite.tide.data.DataObserveParams;
    import org.granite.tide.data.DataPublishParams;
    import org.granite.tide.data.DataTopicParams;

    public class ObserveAllPublishAll implements DataTopicParams {

    public void observes(DataObserveParams params) {
    // Define key/value pairs that the client is able to observe
    // Will be used to construct the topic selector for the client calling the component
    }

    public void publishes(DataPublishParams params, Object entity) {
    // Define key/value pairs to add in the published message headers
    // Will be used to match against the topic selector of the subscribed clients
    }
    }

    - 'publish' defines the publishing mode. ON_SUCCESS indicates that all remote calls on annotated components that do not trigger exceptions will dispatch the corresponding entity updates. In general you will want to have more control on the dispatching and use the MANUAL mode to be sure that updates are dispatched only on transaction success and include the dispatch in a Grails interceptor. We could also have used a transactional JMS topic to have a real transactional behaviour. Let's keep it simple for this example.

    On Flex side, you then have to add the data observer component in the main MXML:

    grails-app/views/GDSExample.mxml :
                import org.granite.tide.data.DataObserver;

    // Register a data observer component with the name of the topic
    Spring.getInstance().addComponent("bookManagerTopic", DataObserver);
    // Binds the subscribe and unsubscribe methods of the component to the application login/logout events
    Spring.getInstance().addEventObserver("org.granite.tide.login", "bookManagerTopic", "subscribe");
    Spring.getInstance().addEventObserver("org.granite.tide.logout", "bookManagerTopic", "unsubscribe");

    [In]
    public var bookManagerTopic:DataObserver;

    An interesting thing here is how you can bind a Tide event to any Tide component method, allowing for a complete decoupling between the component and the application.

    Now if you open two browsers on the Flex application (in different http sessions, so for example you can try with one Firefox and one Internet Explorer, or better on two different machines), you can check that updates saved on one browser are (almost) immediately visible on the other.

    If you look at the console, you will most likely see a lot of error stack traces concerning some RetryRequest error. This has something to do with some Grails filter logging the Jetty continuation retry exception. That's not extremely important, and it will be addressed in a later release. These configuration aspects of Gravity and other advanced features will also be improved to avoid having many places where to change configuration and centralize most of it in the GraniteDSConfig.groovy file.


    Now we've seen a simple use of most features of GraniteDS. The complete project is available [here|http://www.graniteds.org/confluence/download/attachments/9371677/gdsexample-0.3.zip] and can be unzipped after having created the project and installed the various plugins (also remember to create roles and user otherwise you won't be able to log in).
    We could have implemented the server side with any other Java server technology supported out-of-the-box by GDS/Tide (JBoss Seam, Spring, EJB3) with minimal change on the Flex side, but the Grails/GraniteDS combination seems a good choice to quickly develop Flex applications with a Java server backend.

    lundi 30 mars 2009

    Building a Flex multi-tab CRUD application with the Grails GraniteDS plugin

    Granite Data Services provides a complete platform for building Flex RIAs with a Java backend. I'm going to show how to build a simple multi-tab CRUD application in a few steps. GraniteDS 2.0 brings a lot of improvements in the Spring integration and now supports Grails with a specific plugin. The Flex/Grails/GraniteDS combination is very efficient and makes building applications quite fast, that's why I will build the backend with Grails. Moreover it makes extremely easy to create and setup the project. We could also have built the backend with Spring or JBoss Seam with very few changes in the Flex application itself.

    We start by creating a new Grails application with the GDSFlex plugin (now at version 0.2), assuming Grails 1.1 is installed somewhere :
    grails create-app gdsexample
    cd gdsexample
    grails install-plugin gdsflex

    The main part of the job is to define our model. We are going to build a very simple book manager, so we will need two Book and Chapter domain classes.
    grails create-domain-class Book
    grails create-domain-class Chapter

    These domain classes are empty for now so let's add a few properties.

    grails-app/domain/Book.groovy
    import javax.persistence.*

    @Entity
    class Book {

    static constraints = {
    title(size:0..100, blank:false)
    }

    @Id
    Long id

    @Version
    Integer version

    String uid

    String title

    String author

    String description

    Set<Chapter> chapters
    static hasMany = [chapters:Chapter]
    static mapping = {
    chapters cascade:"all,delete-orphan"
    }
    }

    grails-app/domain/Chapter.groovy :
    import javax.persistence.*

    @Entity
    class Chapter {

    static constraints = {
    title(size:0..100, blank:false)
    }

    @Id
    Long id

    @Version
    Integer version

    String uid

    Book book

    String title

    String summary
    }

    You can notice that these are not pure GORM entities. GraniteDS requires at least the 3 JPA annotations @Entity, @Id and @Version to be able to correctly generate the AS3 classes. This is the only restriction on the domain classes and all other fields can be defined as for any GORM entity.
    Another particularity of these domain classes is the uid field that will be used as a unique identifier when exchanging data between the Flex, Hibernate and database layers. It's not mandatory to have one but it can save a lot of problems (mainly with new entities created from Flex).

    Now let's try to compile the project :
    grails compile

    You can notice in the console that the Grails compilation has triggered the Gas3 generator and that there are 4 new AS3 classes in grails-app/views: Book.as, BookBase.as, Chapter.as, ChapterBase.as.
    In general you won't even have to think about these classes and you can just use them in your Flex application. If you need to add some behaviour to the Flex model, you can just modify the non 'Base' classes that won't be overwritten by the generator process.

    We need something to show in our Flex application, so we'll simply use Grails scaffolding to get a simple Web UI and populate some data.
    grails create-controller Book

    Edit the controller in grails-app/controllers/BookController.groovy :
    class BookController {

    def index = { redirect(action:list, params:params) }

    static scaffold = Book
    }

    Go to http://localhost:8080/gdsexample/book/list and create a few books.


    To display these books in a Flex application, we will make use of the PagedQuery Flex component that handles data paging and sorting with a server backend. First we need to create the corresponding Grails service that implements a 'find' method:

    grails create-service BookList


    grails-app/services/BookListService.groovy :
    import org.granite.tide.annotations.TideEnabled

    @TideEnabled
    class BookListService {

    boolean transactional = true

    def find(filter, offset, max, sort, order) {
    if (max == 0)
    max = 20

    return [
    firstResult: offset,
    maxResults: max,
    resultCount: Book.count(),
    resultList: Book.list([offset: offset, max: max, sort: sort, order: order ? "desc" : "asc"])
    ]
    }
    }

    The only remarkable thing is the TideEnabled annotation that will tell the GraniteDS Tide library that the component can be called from Flex.

    Next we build the Flex MXML views:

    grails-app/views/GDSExample.mxml:
    <?xml version="1.0" encoding="utf-8"?>

    <mx:Application
    xmlns:mx="http://www.adobe.com/2006/mxml"
    xmlns="*"
    layout="vertical"
    backgroundGradientColors="[#0e2e7d, #6479ab]"
    preinitialize="Spring.getInstance().initApplication()">

    <mx:Script>
    <![CDATA[
    import org.granite.tide.spring.Spring;
    ]]>
    </mx:Script>

    <mx:VBox id="mainUI" width="100%">
    <mx:ApplicationControlBar id="acb" width="100%">
    <mx:Label text="GraniteDS / Grails example" fontSize="18" fontWeight="bold" color="#f0f0f0"/>
    </mx:ApplicationControlBar>
    </mx:VBox>

    <BookUI id="bookUI" width="100%" height="100%"/>
    </mx:Application>

    The important thing here is the preinitialize handler that bootstraps the Tide runtime.

    Here start the interesting things, the MXML component that will display the list.
    Comments in the source code explain the important parts.

    grails-app/views/BookUI.mxml:
    <?xml version="1.0" encoding="utf-8"?>

    <mx:Panel
    xmlns:mx="http://www.adobe.com/2006/mxml"
    xmlns="*"
    width="100%"
    label="Book Manager"
    creationComplete="list()">

    <!--
    The [Name] metadata indicates that the component has to be managed by Tide.
    This will enable Tide property injections and observer methods.
    As we don't specify a name here, the component will get the name of the Flex component.
    Here the name will be 'bookUI' as defined by the parent MXML.
    -->
    <mx:Metadata>
    [Name]
    </mx:Metadata>

    <mx:Script>
    <![CDATA[
    import org.granite.tide.spring.PagedQuery;

    // This is a property injection definition.
    // The PagedQuery component needs to be linked to a server counterpart with the same name,
    // so here the property is named 'bookListService' as the Grails service.
    // The [In] annotation indicates that the property has to be injected by Tide,
    // meaning that Tide will automatically create a PagedQuery component and bind it to the property.
    // PagedQuery extends the standard Flex ListCollectionView and can be used directly
    // as a data provider for the DataGrid (as shown below).
    [Bindable] [In]
    public var bookListService:PagedQuery;

    // This specifies an observer method that will be called
    // when a Tide event with this name is dispatched. It will be used later.
    [Observer("listBook")]
    public function list():void {
    bookListService.refresh();
    }
    ]]>
    </mx:Script>

    <mx:TabNavigator id="nav" width="100%" height="100%">
    <mx:VBox label="Book List">
    <mx:DataGrid id="dgList" dataProvider="{bookListService}" width="400" height="200">
    <mx:columns>
    <mx:DataGridColumn dataField="title"/>
    <mx:DataGridColumn dataField="author"/>
    </mx:columns>
    </mx:DataGrid>

    <mx:Button label="Refresh" click="list()"/>
    </mx:VBox>
    </mx:TabNavigator>

    </mx:Panel>

    If you go to http://localhost:8080/gdsexample/GDSExample.swf, you will get a first look at the application. Unfortunately that first look will be an ArgumentError popup at startup. What has happened is that the Flex compiler did not include the Book class in the swf and that the serialization of the Book objects failed. You can check that we have no reference to the Person class anywhere in the code. To have our application work, we just have to force the compiler to take our class by adding the following variable definition in the MXML script:
    public var dummyBook:Book;

    This dummy definition will not be needed any more at the end when we will have a book form that references this class.


    You can check one of the important features of the Tide framework, the entity cache. If you select a row of the grid and click the refresh button, the selection is not lost, meaning that the instances of the books are exactly the same and are just updated with the data coming from the server.

    Ok, we now have a list, that would be useful to be able to create or edit books, so we need to add a few buttons.
    <?xml version="1.0" encoding="utf-8"?>

    <mx:Panel
    xmlns:mx="http://www.adobe.com/2006/mxml"
    xmlns="*"
    width="100%"
    label="Book Manager"
    creationComplete="list()">

    <mx:Metadata>
    [Name]
    </mx:Metadata>

    <mx:Script>
    <![CDATA[
    import mx.events.ItemClickEvent;
    import mx.collections.ArrayCollection;
    import mx.controls.Alert;
    import mx.binding.utils.BindingUtils;
    import org.granite.tide.events.TideUIConversationEvent;
    import org.granite.tide.events.TideResultEvent;
    import org.granite.tide.spring.Spring;
    import org.granite.tide.spring.PagedQuery;

    public var dummyBook:Book;

    [Bindable] [In]
    public var bookListService:PagedQuery;

    [Observer("listBook")]
    public function list():void {
    bookListService.refresh();
    }

    private function initButtonBar():void {
    BindingUtils.bindProperty(bbMain.getChildAt(1), "enabled", dgList, "selectedItem");
    }

    private function clickHandler(event:ItemClickEvent):void {
    if (event.index == 0)
    dispatchEvent(new TideUIConversationEvent('New Book', 'editBook'));
    else if (event.index == 1 && dgList.selectedItem)
    dispatchEvent(new TideUIConversationEvent('Book#' + dgList.selectedItem.id, 'editBook', dgList.selectedItem));
    }
    ]]>
    </mx:Script>

    <mx:TabNavigator id="nav" width="100%" height="100%">
    <mx:VBox label="Book List">
    <mx:ButtonBar id="bbMain" creationComplete="initButtonBar()" itemClick="clickHandler(event);">
    <mx:dataProvider>
    <mx:Array>
    <mx:String>New Book</mx:String>
    <mx:String>Edit Book</mx:String>
    </mx:Array>
    </mx:dataProvider>
    </mx:ButtonBar>

    <mx:DataGrid id="dgList" dataProvider="{bookListService}" width="400" height="200">
    <mx:columns>
    <mx:DataGridColumn dataField="title"/>
    <mx:DataGridColumn dataField="author"/>
    </mx:columns>
    </mx:DataGrid>

    <mx:Button label="Refresh" click="list()"/>
    </mx:VBox>
    </mx:TabNavigator>

    </mx:Panel>

    Just adding buttons unfortunately won't be enough, we have to define a controller and UI for the editor panel. Note that the buttons we have defined just dispatch TideUIConversation events. Our application still works, but the new buttons just don't do anything as there is no observer for these events. This shows how the Observer pattern in the Tide framework can help decouple the various parts of the application. We'll see below what conversations mean.
    Before that, we have to build the Grails controller to edit books.
    grails create-controller BookEdit

    grails-app/controllers/BookEditController.groovy :
    import org.granite.tide.annotations.TideEnabled

    @TideEnabled
    class BookEditController {

    // The bookInstance property of the controller will be the model that we bind to the Flex view.
    Book bookInstance

    // The remove method has nothing very particular and is very similar
    // to the default delete method of the standard Grails controller scaffolding.
    def remove = {
    bookInstance = Book.get(params.id)
    if (bookInstance)
    bookInstance.delete()
    }

    // The merge and persist method are similar: we get the bookInstance from the params map
    // and merge/persist it in the current persistence context.
    // Note that we get directly a typed Hibernate detached entity from the params map,
    // we'll see below how this map is sent by the client.
    // The validation part is a little different from classic Grails controllers, so we'll see it later.
    def merge = {
    bookInstance = params.bookInstance

    if (!bookInstance.validate())
    throw new org.granite.tide.spring.SpringValidationException(bookInstance.errors);

    bookInstance = bookInstance.merge()
    }

    def persist = {
    bookInstance = params.bookInstance

    if (!bookInstance.validate())
    throw new org.granite.tide.spring.SpringValidationException(bookInstance.errors);

    bookInstance.save()
    }
    }

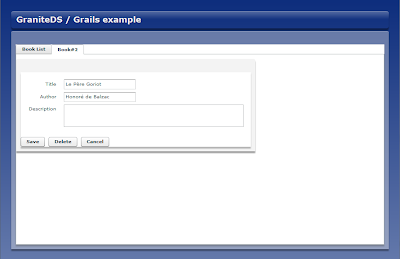
    And we keep the more complex part for the end.

    grails-app/views/BookEdit.mxml:
    <?xml version="1.0" encoding="utf-8"?>

    <mx:VBox
    xmlns:mx="http://www.adobe.com/2006/mxml"
    xmlns="*"
    width="100%"
    label="{create ? "New book" : bookInstance.title}">

    <mx:Script>
    <![CDATA[
    import mx.controls.Alert;
    import mx.events.CloseEvent;
    import mx.containers.TabNavigator;
    import mx.collections.ArrayCollection;
    import org.granite.tide.spring.Context;
    import org.granite.tide.events.TideResultEvent;
    import org.granite.tide.events.TideFaultEvent;


    // The Tide context is injected in the component.
    // It will be used to manage the conversation.
    [Bindable] [In]
    public var context:Context;

    // We get injected with the main tab navigator with a kind of EL expression.
    // We could also have accessed the component with context.bookUI.nav
    [Bindable] [In("#{bookUI.nav}")]
    public var nav:TabNavigator;

    // We get injected with a proxy of the Grails edit controller.
    [Bindable] [In]
    public var bookEditController:Object;

    // We make a two-way binding between the bookInstance to the context.
    // So we can set the instance in this component and get it back from
    // outside.
    [Bindable] [In] [Out]
    public var bookInstance:Book;

    [Bindable]
    private var create:Boolean;


    // This observer will be called when someone dispatches the editBook Tide event.
    [Observer("editBook")]
    public function edit(bookInstance:Book = null):void {
    create = bookInstance == null;
    if (create) {
    this.bookInstance = new Book();
    this.bookInstance.chapters = new ArrayCollection();
    }
    else
    this.bookInstance = bookInstance;

    // Add itself as a child tab in the main view
    if (!nav.getChildByName(this.name))
    nav.addChild(this);
    nav.selectedChild = this;
    }


    private function save():void {
    bookInstance.title = title.text;
    bookInstance.author = author.text;
    bookInstance.description = description.text;

    // The 'Save' button calls the remote controller and passes it a params map.
    // That's how the Grails controller can get the book with params.bookInstance.
    if (create)
    bookEditController.persist({ bookInstance: bookInstance }, saveResult);
    else
    bookEditController.merge({ bookInstance: bookInstance }, saveResult);
    }

    // Result handler for the remote controller call
    private function saveResult(event:TideResultEvent):void {
    nav.removeChild(this);
    // If the book was a new one, trigger a refresh of the list to show the new book.
    // Note once again that we don't know here who will handle the raised event.
    if (create)
    context.raiseEvent("listBook");
    // Merges the current conversation context in the global context
    // (update the existing entities) and destroys the current conversation context.
    context.meta_end(true);
    }

    private function cancel():void {
    nav.removeChild(this);
    // The cancel button does not merge the conversation in the global context,
    // so all that has been modified in the form is discarded.
    context.meta_end(false);
    }


    public function remove():void {
    Alert.show('Are you sure ?', 'Confirmation', (Alert.YES | Alert.NO),
    null, removeConfirm);
    }

    private function removeConfirm(event:CloseEvent):void {
    if (event.detail == Alert.YES)
    bookEditController.remove({id: bookInstance.id}, removeResult);
    }

    private function removeResult(event:TideResultEvent):void {
    nav.removeChild(this);
    context.raiseEvent("listBook");
    context.meta_end(true);
    }
    ]]>
    </mx:Script>

    <mx:Panel>
    <mx:Form id="bookForm">
    <mx:FormItem label="Title">
    <mx:TextInput id="title" text="{bookInstance.title}"/>
    </mx:FormItem>
    <mx:FormItem label="Author">
    <mx:TextInput id="author" text="{bookInstance.author}"/>
    </mx:FormItem>
    <mx:FormItem label="Description">
    <mx:TextArea id="description" text="{bookInstance.description}" width="400" height="50"/>
    </mx:FormItem>
    </mx:Form>

    <mx:HBox>
    <mx:Button label="Save" click="save()"/>
    <mx:Button label="Delete" enabled="{!create}" click="remove()"/>
    <mx:Button label="Cancel" click="cancel()"/>
    </mx:HBox>
    </mx:Panel>

    </mx:VBox>

    The last thing is to define this MXML as a Tide-managed conversation component by adding this in a static block in BookUI.mxml.
    Spring.getInstance().addComponent("bookEdit", BookEdit, true);

    The last parameter set to true indicates that the component will be created in a conversation context. Conversations are a means to have separate component containers that have their own namespace. Each context also has its own entity cache, so changes on entities in a conversation are separate from other conversations.

    If you now browse http://localhost:8080/gdsexample/GDSExample.swf, you can check that you can create new books, but if you try to edit an existing book, you encounter the famous LazyInitializationException when clicking 'Save'. Remembering that the Grails controller gets detached objects, and that the chapters collection is defined lazy, it's clear that we cannot apply the default Grails validation to the bookInstance. We have to disable 'deepValidate' for now.

    grails-app/controllers/BookEditController.groovy:
    def merge = {
    bookInstance = params.bookInstance

    if (!bookInstance.validate([deepValidate: false]))
    throw new org.granite.tide.spring.SpringValidationException(bookInstance.errors);

    bookInstance = bookInstance.merge([deepValidate: false])
    }


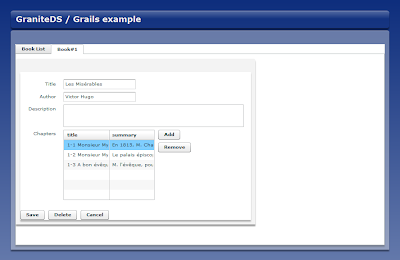
    This time everything should work as expected, you can create, update and delete books. However we have left the chapters aside for now, except that it has brought an issue with lazy loading. We would still like to edit the chapters of a book in the form. All we have to do is to add an editable DataGrid in the Book form:
                <mx:FormItem label="Chapters">
    <mx:HBox>
    <mx:DataGrid id="chapters" dataProvider="{bookInstance.chapters}" editable="true">
    <mx:columns>
    <mx:DataGridColumn dataField="title"/>
    <mx:DataGridColumn dataField="summary"/>
    </mx:columns>
    </mx:DataGrid>

    <mx:VBox>
    <mx:Button label="Add"
    click="addChapter()"/>
    <mx:Button label="Remove"
    enabled="{Boolean(chapters.selectedItem)}"
    click="removeChapter()"/>
    </mx:VBox>
    </mx:HBox>
    </mx:FormItem>

    And the corresponding add/remove event handlers:
                private function addChapter():void {
    var chapter:Chapter = new Chapter();
    chapter.book = bookInstance;
    chapter.title = "";
    chapter.summary = "";
    bookInstance.chapters.addItem(chapter);
    chapters.editedItemPosition = {columnIndex: 0, rowIndex: bookInstance.chapters.length-1 };
    }

    private function removeChapter():void {
    bookInstance.chapters.removeItemAt(chapters.selectedIndex);
    }

    Now that the chapters collection is always initialized, we could even reactivate the deepValidate option in the BookEditController merge closure.


    Finally we will add a minimal validation to show the integration with Grails validation. First we have to activate the client handling of the validation errors in a static block of the main application:

    grails-app/views/GDSExample.mxml :
        <mx:Script>
    <![CDATA[
    import org.granite.tide.spring.Spring;
    import org.granite.tide.validators.ValidatorExceptionHandler;

    Spring.getInstance().addExceptionHandler(ValidatorExceptionHandler);
    ]]>
    </mx:Script>

    grails-app/views/BookEdit.mxml :
    <mx:VBox
    xmlns:mx="http://www.adobe.com/2006/mxml"
    xmlns:tv="org.granite.tide.validators.*"
    ...

    <tv:TideEntityValidator entity="{bookInstance}" property="title" listener="{title}"/>
    </mx:VBox>


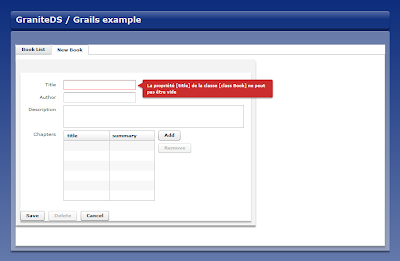
    We've just added a validator for the 'title' property, but it's easy to add one for every field. Of course that doesn't make much sense in this case because a purely client-side Flex validator would be more effective, but it can be used anywhere a Grails validation can.

    With this simple example, we have already seen many important features of GraniteDS/Tide: the Tide client container with injection and observers, the entity cache, the conversation contexts, lazy loading, data paging and Java server integration. The complete project files can be downloaded here and can just be unzipped in the Grails project folder after create-app and install-plugin.

    In a next post, I will show how you can easily add security to the mix, and maybe collaborative data updates between users with the 0.3 plugin.

    As always, feedback and suggestions are welcome.